Skip to content
FOBplans

Single structure · Solo · 1,821 supplies · Large hammer

How to build the Drill Rig

Placement, protection and cost of the Drill Rig: 1351 supplies on the menu, large hammer, FOB required.

Data only· Patch 0.11· Sep 18, 2026Updated Sep 18, 2026
  • 1–2 Players
  • Large hammer
  • Support level 8
  • FOB required
  • 38 min
  • Support 8 · placer
Build modeDownload PNG
Generated preview1 cell = 1.5 m
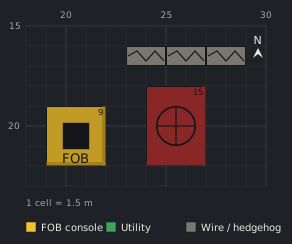
Blueprint, top-down view5 pieces on a 12 × 8 cell grid (1 cell = 1.5 m).2025301520Barbed Wire (23,16)Barbed Wire (25,16)Barbed Wire (27,16)Drill Rig (24,18)15Forward Operating Base (19,19)FOB91 cell = 1.5 mFOB consoleUtilityWire / hedgehog
1,366 menu · ≈1,821
Show as table
#Structurex,yzPhase
consoleForward Operating Base19,1901
drill-rigDrill Rig24,1801
wire-n1Barbed Wire23,1602
wire-n2Barbed Wire25,1602
wire-n3Barbed Wire27,1602

Cost

Menu
1,366 supplies
≈ To finish
1,221–1,821 ‡
Starting stock
1,250
Pallets
2 (1 extra)
Ural trips
1
Cash per match
$10,330
One-time unlocks
$110,000
Builders
2

‡ contains disputed values

Modules used

Parts list

StructureQtyEachMenu≈ To finishHammer
Phase 01 · 1,351 → ≈1,801
Drill Rig11,351 (901)1,351≈1,801Large hammer
Forward Operating Base1300≈0Small hammer
Phase 02 · 15 → ≈20
Barbed Wire3515≈20Small hammer · $30
Total51,366≈1,821Large hammer

Build phases

When fuelled and activated, pulls the Hot Zone to its location and holds it there. One 1,800-fuel pallet runs it for about 220 seconds; afterwards it cools down for 5–20 minutes. Pays $2,500 per activation. Must stand inside the Control Zone. Every rig draws artillery and Stingray drones, so box each one in HESCO at a separate corner. Up to four per base with independent cooldowns: stagger them for permanent control.

Phase 01

Place and build

Open the radial (right mouse + F), page with F until you find the Drill Rig, place it with a green hologram and hammer the yellow X markers. When fuelled and activated, pulls the Hot Zone to its location and holds it there. One 1,800-fuel pallet runs it for about 220 seconds; afterwards it cools down for 5–20 minutes. Pays $2,500 per activation. Must stand inside the Control Zone.

Phase 02

Cover the approach

A single run of barbed wire on the threat side slows anyone walking up with C4 and gives you a warning. Keep the ladder or doorway side facing your console, never the enemy.

Engine notes

  • Disputed menuCost: 1351 (skycoach-building) vs 901 (allthings-cluster).
  • Disputed cooldown: 5–10 min (allthings-cluster) vs 10–20 min (allthings-cluster).
  • HAMMER_ESCALATION · phase 2
  • DISPUTED_VALUE

In-game proof

No in-game proof yet. Built it? Send a screenshot.

Sources

  • skycoach-building
  • mein-mmo-drill
  • allthings-cluster
  • wardogs-zone-db
  • fandom-mechanics
  • Verified on Sep 18, 2026, Patch 0.11 · Methodology

Any · Flat · Drill rig

Related blueprints

Blueprint, top-down view155 pieces on a 25 × 32 cell grid (1 cell = 1.5 m).Barbed Wire (21,19)Barbed Wire (23,19)Barbed Wire (25,19)Barbed Wire (27,19)Barbed Wire (29,19)Barbed Wire (31,19)Barbed Wire (33,19)Barbed Wire (35,19)Barbed Wire (37,19)Hedgehog (20,20)Hedgehog (40,20)Barbed Wire (19,21)HESCO Wall (21,21)2HESCO Wall (25,21)2HESCO Wall (29,21)2HESCO Wall (33,21)2HESCO Block (Large) (37,21)2HESCO Block (Large) (38,21)2HESCO Block (Large) (39,21)2Barbed Wire (41,21)HESCO Wall (21,22)2Bunker (22,22)2HESCO Block (Large) (28,22)2HESCO Block (Large) (29,22)2HESCO Block (Large) (30,22)2HESCO Block (Large) (31,22)2HESCO Block (Large) (32,22)2Bunker (35,22)2HESCO Wall (39,22)2Barbed Wire (19,23)HESCO Block (Large) (28,23)2Drill Rig (29,23)15HESCO Block (Large) (32,23)2Barbed Wire (41,23)HESCO Block (Large) (28,24)2HESCO Block (Large) (32,24)2Barbed Wire (19,25)HESCO Block (Large) (28,25)2HESCO Block (Large) (32,25)2Barbed Wire (41,25)HESCO Wall (21,26)2HESCO Block (Large) (28,26)2HESCO Block (Large) (32,26)2HESCO Wall (39,26)2Barbed Wire (19,27)Door (28,27)2HESCO Block (Large) (29,27)2HESCO Block (Large) (30,27)2HESCO Block (Large) (31,27)2HESCO Block (Large) (32,27)2HESCO Block (Large) (34,27)2HESCO Block (Large) (35,27)2HESCO Block (Large) (36,27)2HESCO Block (Large) (37,27)2HESCO Block (Large) (38,27)2Barbed Wire (41,27)HESCO Block (Large) (28,28)2HESCO Block (Large) (29,28)2HESCO Block (Large) (30,28)2HESCO Block (Large) (31,28)2HESCO Block (Large) (32,28)2Door (34,28)2Drill Rig (35,28)15HESCO Block (Large) (38,28)2Barbed Wire (19,29)HESCO Block (Large) (26,29)2HESCO Block (Large) (27,29)2HESCO Block (Large) (28,29)2Forward Operating Base (29,29)FOB9HESCO Block (Large) (32,29)2HESCO Block (Large) (34,29)2HESCO Block (Large) (38,29)2Barbed Wire (41,29)HESCO Wall (21,30)2Door (26,30)2Door (28,30)2HESCO Block (Large) (32,30)2HESCO Block (Large) (34,30)2HESCO Block (Large) (38,30)2HESCO Wall (39,30)2Barbed Wire (19,31)HESCO Block (Large) (26,31)2HESCO Block (Large) (27,31)2HESCO Block (Large) (28,31)2HESCO Block (Large) (32,31)2HESCO Block (Large) (34,31)2HESCO Block (Large) (38,31)2Barbed Wire (41,31)HESCO Block (Large) (28,32)2HESCO Block (Large) (29,32)2HESCO Block (Large) (30,32)2HESCO Block (Large) (31,32)2HESCO Block (Large) (32,32)2HESCO Block (Large) (34,32)2HESCO Block (Large) (35,32)2HESCO Block (Large) (36,32)2HESCO Block (Large) (37,32)2HESCO Block (Large) (38,32)2Barbed Wire (19,33)Door (28,33)2HESCO Block (Large) (29,33)2HESCO Block (Large) (30,33)2HESCO Block (Large) (31,33)2HESCO Block (Large) (32,33)2Door (36,33)2HESCO Block (Large) (37,33)2Barbed Wire (41,33)HESCO Wall (21,34)2HESCO Block (Large) (28,34)2Drill Rig (29,34)15HESCO Block (Large) (32,34)2HESCO Block (Large) (35,34)2HESCO Block (Large) (38,34)2HESCO Wall (39,34)2Barbed Wire (19,35)HESCO Wall (22,35)2Gate (23,35)2HESCO Wall (27,35)2HESCO Block (Large) (28,35)2HESCO Block (Large) (32,35)2Recon Tower (35,35)5Barbed Wire (41,35)HESCO Block (Large) (28,36)2HESCO Block (Large) (32,36)2Barbed Wire (19,37)HESCO Block (Large) (28,37)2HESCO Block (Large) (32,37)2Barbed Wire (41,37)HESCO Block (Large) (21,38)2HESCO Block (Large) (28,38)2HESCO Block (Large) (29,38)2HESCO Block (Large) (30,38)2HESCO Block (Large) (31,38)2HESCO Block (Large) (32,38)2HESCO Block (Large) (39,38)2HESCO Block (Large) (21,39)2HESCO Block (Large) (22,39)2Gate (23,39)2HESCO Wall (27,39)2HESCO Wall (31,39)2HESCO Wall (35,39)2HESCO Block (Large) (39,39)2Hedgehog (20,40)Hedgehog (40,40)Hedgehog (22,42)Hedgehog (28,42)Hedgehog (25,44)HESCO Wall (21,21) z24HESCO Wall (25,21) z24HESCO Wall (29,21) z24HESCO Wall (33,21) z24HESCO Block (Large) (37,21) z24HESCO Block (Large) (38,21) z24HESCO Block (Large) (39,21) z24Talon 9K-SAM (36,36) z571 cell = 1.5 m
Platoon · 8–12 Players · Large hammer

Team Drill Rig Fortress: Three Staggered Rigs for Permanent Control

A 19×19 ring with airlock, bunkers, a Talon tower, a second wall layer and three boxed drill rigs at separate edges. Fuel logistics keep the Hot Zone parked on your base.

7,400 → ≈9,867 · 6 pallets · $12,170

Blueprint, top-down view20 pieces on a 13 × 8 cell grid (1 cell = 1.5 m).HESCO Block (Large) (25,16)2HESCO Block (Large) (26,16)2HESCO Block (Large) (27,16)2HESCO Block (Large) (28,16)2HESCO Block (Large) (29,16)2Door (25,17)2Drill Rig (26,17)15HESCO Block (Large) (29,17)2HESCO Block (Large) (25,18)2HESCO Block (Large) (29,18)2Forward Operating Base (19,19)FOB9HESCO Block (Large) (25,19)2HESCO Block (Large) (29,19)2HESCO Block (Large) (25,20)2HESCO Block (Large) (29,20)2HESCO Block (Large) (25,21)2HESCO Block (Large) (26,21)2HESCO Block (Large) (27,21)2HESCO Block (Large) (28,21)2HESCO Block (Large) (29,21)21 cell = 1.5 m
Squad · 3–6 Players · Large hammer

Drill rig box

One drill rig inside a box of seventeen large blocks with a door. 1,351 + 252 supplies, and it only works inside the Control Zone.

1,603 → ≈2,137 · 2 pallets · $10,300

Blueprint, top-down view58 pieces on a 17 × 26 cell grid (1 cell = 1.5 m).Barbed Wire (24,22)Barbed Wire (26,22)Barbed Wire (28,22)Barbed Wire (30,22)Barbed Wire (32,22)Barbed Wire (34,22)Barbed Wire (22,24)HESCO Wall (24,24)2HESCO Wall (28,24)2HESCO Wall (32,24)2HESCO Block (Large) (36,24)2HESCO Wall (24,25)2HESCO Block (Large) (28,25)2HESCO Block (Large) (29,25)2HESCO Block (Large) (30,25)2HESCO Block (Large) (31,25)2HESCO Block (Large) (32,25)2HESCO Wall (36,25)2Barbed Wire (22,26)HESCO Block (Large) (28,26)2Forward Operating Base (29,26)FOB9HESCO Block (Large) (32,26)2Door (28,27)2HESCO Block (Large) (32,27)2Barbed Wire (22,28)HESCO Block (Large) (28,28)2HESCO Block (Large) (32,28)2HESCO Wall (24,29)2HESCO Block (Large) (28,29)2HESCO Block (Large) (29,29)2HESCO Block (Large) (30,29)2HESCO Block (Large) (31,29)2HESCO Block (Large) (32,29)2HESCO Block (Large) (36,29)2Barbed Wire (22,30)HESCO Block (Large) (36,30)2HESCO Wall (27,31)2Gate (28,31)2HESCO Wall (32,31)2HESCO Block (Large) (36,31)2Barbed Wire (22,32)Door (36,32)2HESCO Block (Large) (24,33)2HESCO Block (Large) (36,33)2Barbed Wire (22,34)HESCO Block (Large) (24,34)2HESCO Block (Large) (36,34)2HESCO Block (Large) (24,35)2HESCO Block (Large) (27,35)2HESCO Block (Large) (32,35)2HESCO Block (Large) (36,35)2HESCO Wall (24,36)2Gate (28,36)2HESCO Wall (32,36)2HESCO Block (Large) (36,36)2Hedgehog (25,39)Hedgehog (31,39)Hedgehog (28,41)1 cell = 1.5 m
Duo · 2–3 Players · Medium hammer

Duo FOB Core with Vehicle Gate Airlock

Two players, one truck: a boxed console inside a 13×13 ring with a two-gate vehicle airlock, slalom and wire. The base every logistics run starts from.

1,086 → ≈1,448 · 1 pallets · $8,020

Blueprint, top-down view38 pieces on a 20 × 16 cell grid (1 cell = 1.5 m).HESCO Wall (17,27)2HESCO Block (Small) (20,28)HESCO Block (Small) (21,28)HESCO Block (Small) (22,28)HESCO Block (Small) (23,28)HESCO Block (Small) (24,28)HESCO Block (Large) (28,28)2HESCO Block (Large) (29,28)2HESCO Block (Large) (30,28)2HESCO Block (Large) (31,28)2HESCO Block (Large) (32,28)2HESCO Block (Small) (20,29)L81 Mortar (21,29)HESCO Block (Small) (24,29)HESCO Block (Large) (28,29)2Forward Operating Base (29,29)FOB9HESCO Block (Large) (32,29)2HESCO Block (Small) (20,30)HESCO Block (Large) (28,30)2Door (32,30)2HESCO Wall (17,31)2HESCO Block (Small) (20,31)HESCO Block (Large) (28,31)2HESCO Block (Large) (32,31)2HESCO Block (Small) (20,32)HESCO Block (Small) (21,32)HESCO Block (Small) (22,32)HESCO Block (Small) (23,32)HESCO Block (Small) (24,32)HESCO Block (Large) (28,32)2HESCO Block (Large) (29,32)2HESCO Block (Large) (30,32)2HESCO Block (Large) (31,32)2HESCO Block (Large) (32,32)2Sandbag Wall (20,34)Sandbag Wall (22,34)Recon Tent (21,36)Barbed Wire (21,40)1 cell = 1.5 m
Duo · 2–3 Players · Large hammer

Duo Mortar Pit: L81 with a Clear Arc

A boxed console, an L81 in a low ring with a rear gap, a two-wall screen and a recon tent for the spotter. First Driver run is Ammo, not Build.

577 → ≈769 · 1 pallets · $9,910

MortarForwardData only