Skip to content
FOBplans

Module · Squad · 2,137 supplies · Large hammer

Drill rig box

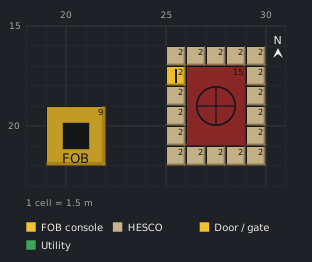
One drill rig inside a box of seventeen large blocks with a door. 1,351 + 252 supplies, and it only works inside the Control Zone.

Data only· Patch 0.11· Sep 18, 2026Updated Sep 18, 2026
  • 3–6 Players
  • Large hammer
  • Support level 8
  • FOB required
  • 25 min
  • Support 8 · placer
  • Driver 3 · logistics
Build modeDownload PNG
Generated preview1 cell = 1.5 m
Blueprint, top-down view20 pieces on a 13 × 8 cell grid (1 cell = 1.5 m).2025301520HESCO Block (Large) (25,16)2HESCO Block (Large) (26,16)2HESCO Block (Large) (27,16)2HESCO Block (Large) (28,16)2HESCO Block (Large) (29,16)2Door (25,17)2Drill Rig (26,17)15HESCO Block (Large) (29,17)2HESCO Block (Large) (25,18)2HESCO Block (Large) (29,18)2Forward Operating Base (19,19)FOB9HESCO Block (Large) (25,19)2HESCO Block (Large) (29,19)2HESCO Block (Large) (25,20)2HESCO Block (Large) (29,20)2HESCO Block (Large) (25,21)2HESCO Block (Large) (26,21)2HESCO Block (Large) (27,21)2HESCO Block (Large) (28,21)2HESCO Block (Large) (29,21)21 cell = 1.5 mFOB consoleHESCODoor / gateUtility
1,603 menu · ≈2,137
Show as table
#Structurex,yzPhase
consoleForward Operating Base19,1901
rigDrill Rig26,1702
rig-b1HESCO Block (Large)25,1603
rig-b2HESCO Block (Large)25,2103
rig-b3HESCO Block (Large)26,1603
rig-b4HESCO Block (Large)26,2103
rig-b5HESCO Block (Large)27,1603
rig-b6HESCO Block (Large)27,2103
rig-b7HESCO Block (Large)28,1603
rig-b8HESCO Block (Large)28,2103
rig-b9HESCO Block (Large)29,1603
rig-b10HESCO Block (Large)29,2103
rig-doorDoor25,1703
rig-b12HESCO Block (Large)29,1703
rig-b13HESCO Block (Large)25,1803
rig-b14HESCO Block (Large)29,1803
rig-b15HESCO Block (Large)25,1903
rig-b16HESCO Block (Large)29,1903
rig-b17HESCO Block (Large)25,2003
rig-b18HESCO Block (Large)29,2003

Cost

Menu
1,603 supplies
≈ To finish
1,537–2,228 ‡
Starting stock
1,250
Pallets
2 (1 extra)
Ural trips
1
Cash per match
$10,300
One-time unlocks
$110,000
Builders
6

‡ contains disputed values

Modules used

Parts list

StructureQtyEachMenu≈ To finishHammer
Phase 01 · 0 → ≈0
Forward Operating Base1300≈0Small hammer
Phase 02 · 1,351 → ≈1,801
Drill Rig11,351 (901)1,351≈1,801Large hammer
Phase 03 · 252 → ≈336
HESCO Block (Large)1714 (18)238≈317Medium hammer
Door11414≈19Medium hammer
Total201,603≈2,137Large hammer

Build phases

A running rig pulls the Hot Zone to you and every artillery piece on the map with it. The box soaks the first C4 and rockets; fuel logistics do the rest.

Phase 01

Console first

Deploy the FOB and take the Medium hammer from the console. Everything below is placed relative to the console at cell 20,20.

Phase 02

Rig

Inside the Control Zone only (the placement error says so otherwise). Six cells from the console so the box fits.

Phase 03

Box and fuel

Seventeen large blocks and a door. Bring at least 1,200 Fuel before you press activate; a full pallet runs it for roughly 220 seconds.

Engine notes

  • HAMMER_ESCALATION · phase 3
  • DISPUTED_VALUE
  • DISPUTED_VALUE
  • DISPUTED_VALUE

In-game proof

No in-game proof yet. Built it? Send a screenshot.

Sources

  • steam-skivin
  • allthings-cluster
  • wardogs-zone-db
  • fobplans-research
  • Verified on Sep 18, 2026, Patch 0.11 · Methodology

Any · Flat · Drill rig · Hot Zone hold

Related blueprints

Blueprint, top-down view155 pieces on a 25 × 32 cell grid (1 cell = 1.5 m).Barbed Wire (21,19)Barbed Wire (23,19)Barbed Wire (25,19)Barbed Wire (27,19)Barbed Wire (29,19)Barbed Wire (31,19)Barbed Wire (33,19)Barbed Wire (35,19)Barbed Wire (37,19)Hedgehog (20,20)Hedgehog (40,20)Barbed Wire (19,21)HESCO Wall (21,21)2HESCO Wall (25,21)2HESCO Wall (29,21)2HESCO Wall (33,21)2HESCO Block (Large) (37,21)2HESCO Block (Large) (38,21)2HESCO Block (Large) (39,21)2Barbed Wire (41,21)HESCO Wall (21,22)2Bunker (22,22)2HESCO Block (Large) (28,22)2HESCO Block (Large) (29,22)2HESCO Block (Large) (30,22)2HESCO Block (Large) (31,22)2HESCO Block (Large) (32,22)2Bunker (35,22)2HESCO Wall (39,22)2Barbed Wire (19,23)HESCO Block (Large) (28,23)2Drill Rig (29,23)15HESCO Block (Large) (32,23)2Barbed Wire (41,23)HESCO Block (Large) (28,24)2HESCO Block (Large) (32,24)2Barbed Wire (19,25)HESCO Block (Large) (28,25)2HESCO Block (Large) (32,25)2Barbed Wire (41,25)HESCO Wall (21,26)2HESCO Block (Large) (28,26)2HESCO Block (Large) (32,26)2HESCO Wall (39,26)2Barbed Wire (19,27)Door (28,27)2HESCO Block (Large) (29,27)2HESCO Block (Large) (30,27)2HESCO Block (Large) (31,27)2HESCO Block (Large) (32,27)2HESCO Block (Large) (34,27)2HESCO Block (Large) (35,27)2HESCO Block (Large) (36,27)2HESCO Block (Large) (37,27)2HESCO Block (Large) (38,27)2Barbed Wire (41,27)HESCO Block (Large) (28,28)2HESCO Block (Large) (29,28)2HESCO Block (Large) (30,28)2HESCO Block (Large) (31,28)2HESCO Block (Large) (32,28)2Door (34,28)2Drill Rig (35,28)15HESCO Block (Large) (38,28)2Barbed Wire (19,29)HESCO Block (Large) (26,29)2HESCO Block (Large) (27,29)2HESCO Block (Large) (28,29)2Forward Operating Base (29,29)FOB9HESCO Block (Large) (32,29)2HESCO Block (Large) (34,29)2HESCO Block (Large) (38,29)2Barbed Wire (41,29)HESCO Wall (21,30)2Door (26,30)2Door (28,30)2HESCO Block (Large) (32,30)2HESCO Block (Large) (34,30)2HESCO Block (Large) (38,30)2HESCO Wall (39,30)2Barbed Wire (19,31)HESCO Block (Large) (26,31)2HESCO Block (Large) (27,31)2HESCO Block (Large) (28,31)2HESCO Block (Large) (32,31)2HESCO Block (Large) (34,31)2HESCO Block (Large) (38,31)2Barbed Wire (41,31)HESCO Block (Large) (28,32)2HESCO Block (Large) (29,32)2HESCO Block (Large) (30,32)2HESCO Block (Large) (31,32)2HESCO Block (Large) (32,32)2HESCO Block (Large) (34,32)2HESCO Block (Large) (35,32)2HESCO Block (Large) (36,32)2HESCO Block (Large) (37,32)2HESCO Block (Large) (38,32)2Barbed Wire (19,33)Door (28,33)2HESCO Block (Large) (29,33)2HESCO Block (Large) (30,33)2HESCO Block (Large) (31,33)2HESCO Block (Large) (32,33)2Door (36,33)2HESCO Block (Large) (37,33)2Barbed Wire (41,33)HESCO Wall (21,34)2HESCO Block (Large) (28,34)2Drill Rig (29,34)15HESCO Block (Large) (32,34)2HESCO Block (Large) (35,34)2HESCO Block (Large) (38,34)2HESCO Wall (39,34)2Barbed Wire (19,35)HESCO Wall (22,35)2Gate (23,35)2HESCO Wall (27,35)2HESCO Block (Large) (28,35)2HESCO Block (Large) (32,35)2Recon Tower (35,35)5Barbed Wire (41,35)HESCO Block (Large) (28,36)2HESCO Block (Large) (32,36)2Barbed Wire (19,37)HESCO Block (Large) (28,37)2HESCO Block (Large) (32,37)2Barbed Wire (41,37)HESCO Block (Large) (21,38)2HESCO Block (Large) (28,38)2HESCO Block (Large) (29,38)2HESCO Block (Large) (30,38)2HESCO Block (Large) (31,38)2HESCO Block (Large) (32,38)2HESCO Block (Large) (39,38)2HESCO Block (Large) (21,39)2HESCO Block (Large) (22,39)2Gate (23,39)2HESCO Wall (27,39)2HESCO Wall (31,39)2HESCO Wall (35,39)2HESCO Block (Large) (39,39)2Hedgehog (20,40)Hedgehog (40,40)Hedgehog (22,42)Hedgehog (28,42)Hedgehog (25,44)HESCO Wall (21,21) z24HESCO Wall (25,21) z24HESCO Wall (29,21) z24HESCO Wall (33,21) z24HESCO Block (Large) (37,21) z24HESCO Block (Large) (38,21) z24HESCO Block (Large) (39,21) z24Talon 9K-SAM (36,36) z571 cell = 1.5 m
Platoon · 8–12 Players · Large hammer

Team Drill Rig Fortress: Three Staggered Rigs for Permanent Control

A 19×19 ring with airlock, bunkers, a Talon tower, a second wall layer and three boxed drill rigs at separate edges. Fuel logistics keep the Hot Zone parked on your base.

7,400 → ≈9,867 · 6 pallets · $12,170

Blueprint, top-down view113 pieces on a 28 × 29 cell grid (1 cell = 1.5 m).Barbed Wire (21,19)Barbed Wire (23,19)Barbed Wire (25,19)Barbed Wire (27,19)Barbed Wire (29,19)Barbed Wire (31,19)Barbed Wire (33,19)Barbed Wire (35,19)Barbed Wire (37,19)Hedgehog (20,20)Hedgehog (40,20)Barbed Wire (19,21)HESCO Wall (21,21)2HESCO Wall (25,21)2HESCO Wall (29,21)2HESCO Wall (33,21)2HESCO Block (Large) (37,21)2HESCO Block (Large) (38,21)2HESCO Block (Large) (39,21)2HESCO Wall (21,22)2HESCO Block (Large) (22,22)2HESCO Block (Large) (23,22)2HESCO Block (Large) (24,22)2HESCO Block (Large) (25,22)2HESCO Block (Large) (26,22)2Bunker (34,22)2HESCO Wall (39,22)2Barbed Wire (19,23)HESCO Block (Large) (22,23)2Forward Operating Base (23,23)FOB9HESCO Block (Large) (26,23)2HESCO Block (Large) (22,24)2HESCO Block (Large) (26,24)2HESCO Block (Large) (28,24)2Door (29,24)2Door (30,24)2HESCO Block (Large) (31,24)2Barbed Wire (19,25)HESCO Block (Large) (22,25)2HESCO Block (Large) (26,25)2HESCO Block (Large) (28,25)2HESCO Block (Large) (31,25)2HESCO Wall (21,26)2HESCO Block (Large) (22,26)2HESCO Block (Large) (23,26)2Door (24,26)2HESCO Block (Large) (25,26)2HESCO Block (Large) (26,26)2HESCO Block (Large) (39,26)2Barbed Wire (19,27)HESCO Block (Large) (39,27)2Hedgehog (42,27)HESCO Block (Large) (39,28)2Barbed Wire (19,29)Gate (39,29)2HESCO Wall (21,30)2Hedgehog (44,30)Barbed Wire (19,31)Barbed Wire (19,33)HESCO Wall (39,33)2Hedgehog (42,33)HESCO Wall (21,34)2Bunker (22,34)2HESCO Block (Large) (28,34)2HESCO Block (Large) (31,34)2HESCO Block (Large) (34,34)2Talon 9K-SAM (35,34)2HESCO Block (Large) (37,34)2Barbed Wire (19,35)HESCO Block (Large) (28,35)2Door (29,35)2Door (30,35)2HESCO Block (Large) (31,35)2HESCO Block (Large) (34,35)2HESCO Block (Large) (37,35)2HESCO Block (Large) (34,36)2HESCO Block (Large) (35,36)2HESCO Block (Large) (36,36)2HESCO Block (Large) (37,36)2Barbed Wire (19,37)HESCO Block (Large) (39,37)2HESCO Block (Large) (21,38)2HESCO Block (Large) (39,38)2HESCO Wall (21,39)2HESCO Wall (25,39)2HESCO Wall (29,39)2HESCO Wall (33,39)2HESCO Block (Large) (37,39)2HESCO Block (Large) (38,39)2HESCO Block (Large) (39,39)2Hedgehog (20,40)Hedgehog (40,40)Barbed Wire (21,41)Barbed Wire (23,41)Barbed Wire (25,41)Barbed Wire (27,41)Barbed Wire (29,41)Barbed Wire (31,41)Barbed Wire (33,41)Barbed Wire (35,41)Barbed Wire (37,41)HESCO Wall (21,21) z24HESCO Wall (25,21) z24HESCO Wall (29,21) z24HESCO Wall (33,21) z24HESCO Block (Large) (37,21) z24HESCO Block (Large) (38,21) z24HESCO Block (Large) (39,21) z24HESCO Wall (21,22) z24HESCO Wall (21,26) z24HESCO Wall (21,30) z24HESCO Wall (21,34) z24HESCO Block (Large) (21,38) z241 cell = 1.5 m
Platoon · 7–10 Players · Large hammer

Team Tower Lock: Sealing a Map Tower as Team Overwatch

A 19×19 ring around a map tower: two-door vestibules on both ground entrances, corner bunkers, a Talon ground box, two-high walls on the exposed faces. The tower interior is not buildable, so the lock is built outside.

2,748 → ≈3,664 · 3 pallets · $10,970

Blueprint, top-down view86 pieces on a 21 × 28 cell grid (1 cell = 1.5 m).Barbed Wire (23,21)Barbed Wire (25,21)Barbed Wire (27,21)Barbed Wire (29,21)Barbed Wire (31,21)Barbed Wire (33,21)Barbed Wire (35,21)Hedgehog (22,22)Hedgehog (38,22)Barbed Wire (21,23)HESCO Wall (23,23)2HESCO Wall (27,23)2HESCO Wall (31,23)2HESCO Block (Large) (35,23)2HESCO Block (Large) (36,23)2HESCO Block (Large) (37,23)2Barbed Wire (39,23)HESCO Wall (23,24)2Bunker (24,24)2Bunker (33,24)2HESCO Wall (37,24)2Barbed Wire (21,25)Barbed Wire (39,25)Barbed Wire (21,27)Barbed Wire (39,27)HESCO Wall (23,28)2HESCO Block (Large) (30,28)2HESCO Block (Large) (31,28)2HESCO Block (Large) (32,28)2HESCO Block (Large) (33,28)2HESCO Block (Large) (34,28)2HESCO Wall (37,28)2Barbed Wire (21,29)HESCO Block (Large) (28,29)2HESCO Block (Large) (29,29)2HESCO Block (Large) (30,29)2Forward Operating Base (31,29)FOB9HESCO Block (Large) (34,29)2Barbed Wire (39,29)Door (28,30)2Door (30,30)2HESCO Block (Large) (34,30)2Barbed Wire (21,31)HESCO Block (Large) (28,31)2HESCO Block (Large) (29,31)2HESCO Block (Large) (30,31)2HESCO Block (Large) (34,31)2Barbed Wire (39,31)HESCO Wall (23,32)2HESCO Block (Large) (30,32)2HESCO Block (Large) (31,32)2HESCO Block (Large) (32,32)2HESCO Block (Large) (33,32)2HESCO Block (Large) (34,32)2HESCO Wall (37,32)2Barbed Wire (21,33)HESCO Wall (24,33)2Gate (25,33)2HESCO Wall (29,33)2HESCO Block (Large) (31,33)2Recon Tower (32,33)5Barbed Wire (39,33)Door (30,34)2Barbed Wire (21,35)HESCO Block (Large) (30,35)2Barbed Wire (39,35)HESCO Block (Large) (23,36)2HESCO Block (Large) (31,36)2HESCO Block (Large) (37,36)2HESCO Block (Large) (23,37)2HESCO Block (Large) (24,37)2Gate (25,37)2HESCO Wall (29,37)2HESCO Wall (33,37)2HESCO Block (Large) (37,37)2Hedgehog (22,38)Hedgehog (38,38)Hedgehog (24,40)Hedgehog (30,40)Hedgehog (27,42)HESCO Wall (23,23) z24HESCO Wall (27,23) z24HESCO Wall (31,23) z24HESCO Block (Large) (35,23) z24HESCO Block (Large) (36,23) z24HESCO Block (Large) (37,23) z241 cell = 1.5 m
Squad · 4–6 Players · Large hammer

Squad Hot Zone Bastion (4–6 Players, Two-High Walls)

A 15×15 ring with vehicle airlock, two bunkers covering the far wall, a tower with kill box, a second wall layer on the threat face, hedgehogs and wire. Built to sit in the Hot Zone and stay there.

1,730 → ≈2,307 · 2 pallets · $10,510

Blueprint, top-down view234 pieces on a 36 × 39 cell grid (1 cell = 1.5 m).Sandbag Wall (43,9)Sandbag Wall (45,9)Recon Tent (44,11)Barbed Wire (17,15)Barbed Wire (19,15)Barbed Wire (21,15)Barbed Wire (23,15)Barbed Wire (25,15)Barbed Wire (27,15)Barbed Wire (29,15)Barbed Wire (31,15)Barbed Wire (33,15)Barbed Wire (35,15)Barbed Wire (37,15)Barbed Wire (39,15)Barbed Wire (41,15)Barbed Wire (44,15)Barbed Wire (15,17)Bremer Wall (17,17)3Bremer Wall (18,17)3Bremer Wall (19,17)3Bremer Wall (20,17)3Bremer Wall (21,17)3Bremer Wall (22,17)3Bremer Wall (23,17)3Bremer Wall (24,17)3Bremer Wall (25,17)3Bremer Wall (26,17)3Bremer Wall (27,17)3Bremer Wall (28,17)3Bremer Wall (29,17)3Bremer Wall (30,17)3Bremer Wall (31,17)3Bremer Wall (32,17)3Bremer Wall (33,17)3Bremer Wall (34,17)3Bremer Wall (35,17)3Bremer Wall (36,17)3Bremer Wall (37,17)3Bremer Wall (38,17)3Bremer Wall (39,17)3Bremer Wall (40,17)3Bremer Wall (41,17)3Bremer Wall (42,17)3Bremer Wall (43,17)3Bremer Wall (17,18)3Bremer Wall (43,18)3Barbed Wire (15,19)Bremer Wall (17,19)3Bremer Wall (43,19)3Bremer Wall (17,20)3Bremer Wall (43,20)3Barbed Wire (15,21)Bremer Wall (17,21)3Bremer Wall (43,21)3Bremer Wall (17,22)3HESCO Wall (22,22)2HESCO Wall (26,22)2HESCO Wall (30,22)2HESCO Wall (34,22)2HESCO Block (Large) (38,22)2Bremer Wall (43,22)3Barbed Wire (15,23)Bremer Wall (17,23)3HESCO Wall (22,23)2Bunker (23,23)2Bunker (34,23)2HESCO Wall (38,23)2Bremer Wall (43,23)3Bremer Wall (17,24)3Bremer Wall (43,24)3Barbed Wire (15,25)Bremer Wall (17,25)3Bremer Wall (43,25)3Bremer Wall (17,26)3Bremer Wall (43,26)3Barbed Wire (15,27)Bremer Wall (17,27)3HESCO Wall (22,27)2HESCO Block (Small) (23,27)HESCO Block (Small) (24,27)HESCO Block (Small) (25,27)HESCO Block (Small) (26,27)HESCO Block (Small) (27,27)HESCO Block (Large) (29,27)2Door (30,27)2HESCO Block (Large) (31,27)2HESCO Wall (38,27)2Bremer Wall (43,27)3Bremer Wall (17,28)3HESCO Block (Small) (23,28)L81 Mortar (24,28)HESCO Block (Small) (27,28)HESCO Block (Large) (29,28)2HESCO Block (Large) (31,28)2Bremer Wall (43,28)3Barbed Wire (15,29)Bremer Wall (17,29)3HESCO Block (Small) (23,29)HESCO Block (Large) (28,29)2HESCO Block (Large) (29,29)2Door (30,29)2HESCO Block (Large) (31,29)2HESCO Block (Large) (32,29)2Gate (43,29)2Hedgehog (46,29)Bremer Wall (17,30)3HESCO Block (Small) (23,30)HESCO Block (Large) (28,30)2Forward Operating Base (29,30)FOB9HESCO Block (Large) (32,30)2Barbed Wire (15,31)Bremer Wall (17,31)3HESCO Wall (22,31)2HESCO Block (Small) (23,31)HESCO Block (Small) (24,31)HESCO Block (Small) (25,31)HESCO Block (Small) (26,31)HESCO Block (Small) (27,31)HESCO Block (Large) (28,31)2HESCO Block (Large) (32,31)2HESCO Wall (38,31)2Bremer Wall (17,32)3HESCO Block (Large) (28,32)2HESCO Block (Large) (32,32)2Door (35,32)2HESCO Block (Large) (36,32)2Hedgehog (48,32)Barbed Wire (15,33)Bremer Wall (17,33)3HESCO Block (Large) (23,33)2HESCO Block (Large) (24,33)2HESCO Block (Large) (25,33)2HESCO Block (Large) (26,33)2HESCO Block (Large) (27,33)2HESCO Block (Large) (28,33)2HESCO Block (Large) (29,33)2HESCO Block (Large) (30,33)2HESCO Block (Large) (31,33)2HESCO Block (Large) (32,33)2HESCO Block (Large) (34,33)2HESCO Block (Large) (37,33)2Bremer Wall (43,33)3Bremer Wall (17,34)3HESCO Block (Large) (23,34)2Stingray (24,34)HESCO Block (Large) (27,34)2Recon Tower (34,34)5Bremer Wall (43,34)3Barbed Wire (15,35)Bremer Wall (17,35)3HESCO Block (Large) (22,35)2HESCO Block (Large) (23,35)2Door (27,35)2HESCO Block (Large) (38,35)2Bremer Wall (43,35)3Hedgehog (46,35)Bremer Wall (17,36)3HESCO Block (Large) (22,36)2HESCO Block (Large) (23,36)2HESCO Block (Large) (27,36)2HESCO Block (Large) (38,36)2Bremer Wall (43,36)3Barbed Wire (15,37)Bremer Wall (17,37)3HESCO Block (Large) (22,37)2HESCO Block (Large) (23,37)2HESCO Block (Large) (24,37)2HESCO Block (Large) (25,37)2HESCO Block (Large) (26,37)2HESCO Block (Large) (27,37)2HESCO Block (Large) (38,37)2Bremer Wall (43,37)3Bremer Wall (17,38)3HESCO Wall (22,38)2HESCO Block (Large) (26,38)2HESCO Block (Large) (27,38)2HESCO Block (Large) (28,38)2Gate (29,38)2HESCO Wall (33,38)2HESCO Block (Large) (37,38)2HESCO Block (Large) (38,38)2Bremer Wall (43,38)3Barbed Wire (15,39)Bremer Wall (17,39)3Bremer Wall (43,39)3Bremer Wall (17,40)3Bremer Wall (43,40)3Barbed Wire (15,41)Bremer Wall (17,41)3Bremer Wall (43,41)3Bremer Wall (17,42)3Bremer Wall (43,42)3Bremer Wall (17,43)3Bremer Wall (18,43)3Bremer Wall (19,43)3Bremer Wall (20,43)3Bremer Wall (21,43)3Bremer Wall (22,43)3Bremer Wall (23,43)3Bremer Wall (24,43)3Bremer Wall (25,43)3Bremer Wall (26,43)3Bremer Wall (27,43)3Bremer Wall (28,43)3Bremer Wall (29,43)3Bremer Wall (30,43)3Bremer Wall (31,43)3Bremer Wall (32,43)3Bremer Wall (33,43)3Bremer Wall (34,43)3Bremer Wall (35,43)3Bremer Wall (36,43)3Bremer Wall (37,43)3Bremer Wall (38,43)3Bremer Wall (39,43)3Bremer Wall (40,43)3Bremer Wall (41,43)3Bremer Wall (42,43)3Bremer Wall (43,43)3Barbed Wire (17,45)Barbed Wire (19,45)Barbed Wire (21,45)Barbed Wire (23,45)Barbed Wire (25,45)Barbed Wire (27,45)Barbed Wire (29,45)Barbed Wire (31,45)Barbed Wire (33,45)Barbed Wire (35,45)Barbed Wire (37,45)Barbed Wire (39,45)Barbed Wire (41,45)Talon 9K-SAM (35,35) z571 cell = 1.5 m
Team · 10–15 Players · Large hammer

Team Layered Citadel: Bremer Shell, HESCO Core, Every Emplacement

A 27×27 Bremer shell around a 17×17 HESCO ring with a four-cell vehicle lane between them, gates offset by 90°, bunkers, Talon tower, mortar pit and Stingray nest. The all-in base for a full team with ten hammers.

3,771 → ≈5,028 · 3 pallets · $11,500