Skip to content
FOBplans

Module · Duo · 431 supplies · Large hammer

Mortar pit

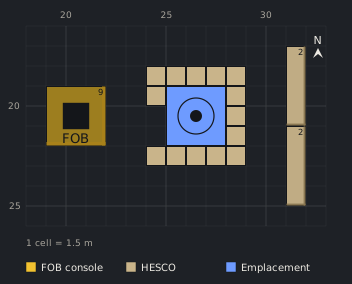
An L81 mortar in a one-block-high ring of small blocks with a rear gap and a two-wall screen behind it. 91 + 140 + 92 supplies.

Data only· Patch 0.11· Sep 18, 2026Updated Sep 18, 2026
  • 2–3 Players
  • Large hammer
  • Support level 8
  • FOB required
  • 12 min
  • Support 8 · placer
  • Driver 3 · logistics
Build modeDownload PNG
Generated preview1 cell = 1.5 m
Blueprint, top-down view18 pieces on a 15 × 10 cell grid (1 cell = 1.5 m).2025302025HESCO Wall (31,17)2HESCO Block (Small) (24,18)HESCO Block (Small) (25,18)HESCO Block (Small) (26,18)HESCO Block (Small) (27,18)HESCO Block (Small) (28,18)Forward Operating Base (19,19)FOB9HESCO Block (Small) (24,19)L81 Mortar (25,19)HESCO Block (Small) (28,19)HESCO Block (Small) (28,20)HESCO Block (Small) (28,21)HESCO Wall (31,21)2HESCO Block (Small) (24,22)HESCO Block (Small) (25,22)HESCO Block (Small) (26,22)HESCO Block (Small) (27,22)HESCO Block (Small) (28,22)1 cell = 1.5 mFOB consoleHESCOEmplacement
323 menu · ≈431
Show as table
#Structurex,yzPhase
consoleForward Operating Base19,1901
mortarL81 Mortar25,1902
pit-n0-n1HESCO Block (Small)24,1803
pit-n0-n2HESCO Block (Small)25,1803
pit-n0-n3HESCO Block (Small)26,1803
pit-n0-n4HESCO Block (Small)27,1803
pit-n0-n5HESCO Block (Small)28,1803
pit-e0-e1HESCO Block (Small)28,1903
pit-e0-e2HESCO Block (Small)28,2003
pit-e0-e3HESCO Block (Small)28,2103
pit-s0-s1HESCO Block (Small)24,2203
pit-s0-s2HESCO Block (Small)25,2203
pit-s0-s3HESCO Block (Small)26,2203
pit-s0-s4HESCO Block (Small)27,2203
pit-s0-s5HESCO Block (Small)28,2203
pit-w0-w1HESCO Block (Small)24,1903
pit-screen-e1HESCO Wall31,1704
pit-screen-e2HESCO Wall31,2104

Cost

Menu
323 supplies
≈ To finish
≈431
Starting stock
1,250 · Covered by the kit stock
Pallets
1 (0 extra)
Ural trips
0
Cash per match
$9,900
One-time unlocks
$75,000
Builders
2

Modules used

Parts list

StructureQtyEachMenu≈ To finishHammer
Phase 01 · 0 → ≈0
Forward Operating Base1300≈0Small hammer
Phase 02 · 91 → ≈121
L81 Mortar19191≈121Large hammer
Phase 03 · 140 → ≈187
HESCO Block (Small)1410140≈187Small hammer
Phase 04 · 92 → ≈123
HESCO Wall24692≈123Medium hammer
Total18323≈431Large hammer

Build phases

Anything taller than one block inside the barrel arc detonates your own shell. The ring is small blocks only; the tall screen sits behind the pit, outside the arc, toward the infantry approach.

Phase 01

Console first

Deploy the FOB and take the Medium hammer from the console. Everything below is placed relative to the console at cell 20,20.

Phase 02

Mortar

Flat ground, barrel arc toward the target sector, five cells from the console. The blueprint drops a ring of planks.

Phase 03

Low ring

Fourteen small blocks around the pit, one high, with a two-cell gap toward the console for the ammo runner.

Phase 04

Screen

Two walls behind the pit block the sightline from the approach. Test-fire before you add anything else.

Engine notes

  • HAMMER_ESCALATION · phase 3
  • HAMMER_ESCALATION · phase 4
  • DISPUTED_VALUE

In-game proof

No in-game proof yet. Built it? Send a screenshot.

Sources

  • steam-skivin
  • allthings-cluster
  • wardogs-zone-db
  • fobplans-research
  • Verified on Sep 18, 2026, Patch 0.11 · Methodology

Any · Flat · Mortar

Related blueprints

Blueprint, top-down view16 pieces on a 11 × 7 cell grid (1 cell = 1.5 m).HESCO Block (Small) (23,18)HESCO Block (Small) (24,18)HESCO Block (Small) (25,18)HESCO Block (Small) (26,18)HESCO Block (Small) (27,18)Forward Operating Base (19,19)FOB9HESCO Block (Small) (23,19)L81 Mortar (24,19)HESCO Block (Small) (27,19)HESCO Block (Small) (27,20)HESCO Block (Small) (27,21)HESCO Block (Small) (23,22)HESCO Block (Small) (24,22)HESCO Block (Small) (25,22)HESCO Block (Small) (26,22)HESCO Block (Small) (27,22)1 cell = 1.5 m
Solo · 1–2 Players · Large hammer

How to build the L81 Mortar

Placement, protection and cost of the L81 Mortar: 91 supplies on the menu, large hammer, FOB required.

231 → ≈308 · 1 pallets · $9,900

MortarData only
Blueprint, top-down view38 pieces on a 20 × 16 cell grid (1 cell = 1.5 m).HESCO Wall (17,27)2HESCO Block (Small) (20,28)HESCO Block (Small) (21,28)HESCO Block (Small) (22,28)HESCO Block (Small) (23,28)HESCO Block (Small) (24,28)HESCO Block (Large) (28,28)2HESCO Block (Large) (29,28)2HESCO Block (Large) (30,28)2HESCO Block (Large) (31,28)2HESCO Block (Large) (32,28)2HESCO Block (Small) (20,29)L81 Mortar (21,29)HESCO Block (Small) (24,29)HESCO Block (Large) (28,29)2Forward Operating Base (29,29)FOB9HESCO Block (Large) (32,29)2HESCO Block (Small) (20,30)HESCO Block (Large) (28,30)2Door (32,30)2HESCO Wall (17,31)2HESCO Block (Small) (20,31)HESCO Block (Large) (28,31)2HESCO Block (Large) (32,31)2HESCO Block (Small) (20,32)HESCO Block (Small) (21,32)HESCO Block (Small) (22,32)HESCO Block (Small) (23,32)HESCO Block (Small) (24,32)HESCO Block (Large) (28,32)2HESCO Block (Large) (29,32)2HESCO Block (Large) (30,32)2HESCO Block (Large) (31,32)2HESCO Block (Large) (32,32)2Sandbag Wall (20,34)Sandbag Wall (22,34)Recon Tent (21,36)Barbed Wire (21,40)1 cell = 1.5 m
Duo · 2–3 Players · Large hammer

Duo Mortar Pit: L81 with a Clear Arc

A boxed console, an L81 in a low ring with a rear gap, a two-wall screen and a recon tent for the spotter. First Driver run is Ammo, not Build.

577 → ≈769 · 1 pallets · $9,910

MortarForwardData only
Blueprint, top-down view234 pieces on a 36 × 39 cell grid (1 cell = 1.5 m).Sandbag Wall (43,9)Sandbag Wall (45,9)Recon Tent (44,11)Barbed Wire (17,15)Barbed Wire (19,15)Barbed Wire (21,15)Barbed Wire (23,15)Barbed Wire (25,15)Barbed Wire (27,15)Barbed Wire (29,15)Barbed Wire (31,15)Barbed Wire (33,15)Barbed Wire (35,15)Barbed Wire (37,15)Barbed Wire (39,15)Barbed Wire (41,15)Barbed Wire (44,15)Barbed Wire (15,17)Bremer Wall (17,17)3Bremer Wall (18,17)3Bremer Wall (19,17)3Bremer Wall (20,17)3Bremer Wall (21,17)3Bremer Wall (22,17)3Bremer Wall (23,17)3Bremer Wall (24,17)3Bremer Wall (25,17)3Bremer Wall (26,17)3Bremer Wall (27,17)3Bremer Wall (28,17)3Bremer Wall (29,17)3Bremer Wall (30,17)3Bremer Wall (31,17)3Bremer Wall (32,17)3Bremer Wall (33,17)3Bremer Wall (34,17)3Bremer Wall (35,17)3Bremer Wall (36,17)3Bremer Wall (37,17)3Bremer Wall (38,17)3Bremer Wall (39,17)3Bremer Wall (40,17)3Bremer Wall (41,17)3Bremer Wall (42,17)3Bremer Wall (43,17)3Bremer Wall (17,18)3Bremer Wall (43,18)3Barbed Wire (15,19)Bremer Wall (17,19)3Bremer Wall (43,19)3Bremer Wall (17,20)3Bremer Wall (43,20)3Barbed Wire (15,21)Bremer Wall (17,21)3Bremer Wall (43,21)3Bremer Wall (17,22)3HESCO Wall (22,22)2HESCO Wall (26,22)2HESCO Wall (30,22)2HESCO Wall (34,22)2HESCO Block (Large) (38,22)2Bremer Wall (43,22)3Barbed Wire (15,23)Bremer Wall (17,23)3HESCO Wall (22,23)2Bunker (23,23)2Bunker (34,23)2HESCO Wall (38,23)2Bremer Wall (43,23)3Bremer Wall (17,24)3Bremer Wall (43,24)3Barbed Wire (15,25)Bremer Wall (17,25)3Bremer Wall (43,25)3Bremer Wall (17,26)3Bremer Wall (43,26)3Barbed Wire (15,27)Bremer Wall (17,27)3HESCO Wall (22,27)2HESCO Block (Small) (23,27)HESCO Block (Small) (24,27)HESCO Block (Small) (25,27)HESCO Block (Small) (26,27)HESCO Block (Small) (27,27)HESCO Block (Large) (29,27)2Door (30,27)2HESCO Block (Large) (31,27)2HESCO Wall (38,27)2Bremer Wall (43,27)3Bremer Wall (17,28)3HESCO Block (Small) (23,28)L81 Mortar (24,28)HESCO Block (Small) (27,28)HESCO Block (Large) (29,28)2HESCO Block (Large) (31,28)2Bremer Wall (43,28)3Barbed Wire (15,29)Bremer Wall (17,29)3HESCO Block (Small) (23,29)HESCO Block (Large) (28,29)2HESCO Block (Large) (29,29)2Door (30,29)2HESCO Block (Large) (31,29)2HESCO Block (Large) (32,29)2Gate (43,29)2Hedgehog (46,29)Bremer Wall (17,30)3HESCO Block (Small) (23,30)HESCO Block (Large) (28,30)2Forward Operating Base (29,30)FOB9HESCO Block (Large) (32,30)2Barbed Wire (15,31)Bremer Wall (17,31)3HESCO Wall (22,31)2HESCO Block (Small) (23,31)HESCO Block (Small) (24,31)HESCO Block (Small) (25,31)HESCO Block (Small) (26,31)HESCO Block (Small) (27,31)HESCO Block (Large) (28,31)2HESCO Block (Large) (32,31)2HESCO Wall (38,31)2Bremer Wall (17,32)3HESCO Block (Large) (28,32)2HESCO Block (Large) (32,32)2Door (35,32)2HESCO Block (Large) (36,32)2Hedgehog (48,32)Barbed Wire (15,33)Bremer Wall (17,33)3HESCO Block (Large) (23,33)2HESCO Block (Large) (24,33)2HESCO Block (Large) (25,33)2HESCO Block (Large) (26,33)2HESCO Block (Large) (27,33)2HESCO Block (Large) (28,33)2HESCO Block (Large) (29,33)2HESCO Block (Large) (30,33)2HESCO Block (Large) (31,33)2HESCO Block (Large) (32,33)2HESCO Block (Large) (34,33)2HESCO Block (Large) (37,33)2Bremer Wall (43,33)3Bremer Wall (17,34)3HESCO Block (Large) (23,34)2Stingray (24,34)HESCO Block (Large) (27,34)2Recon Tower (34,34)5Bremer Wall (43,34)3Barbed Wire (15,35)Bremer Wall (17,35)3HESCO Block (Large) (22,35)2HESCO Block (Large) (23,35)2Door (27,35)2HESCO Block (Large) (38,35)2Bremer Wall (43,35)3Hedgehog (46,35)Bremer Wall (17,36)3HESCO Block (Large) (22,36)2HESCO Block (Large) (23,36)2HESCO Block (Large) (27,36)2HESCO Block (Large) (38,36)2Bremer Wall (43,36)3Barbed Wire (15,37)Bremer Wall (17,37)3HESCO Block (Large) (22,37)2HESCO Block (Large) (23,37)2HESCO Block (Large) (24,37)2HESCO Block (Large) (25,37)2HESCO Block (Large) (26,37)2HESCO Block (Large) (27,37)2HESCO Block (Large) (38,37)2Bremer Wall (43,37)3Bremer Wall (17,38)3HESCO Wall (22,38)2HESCO Block (Large) (26,38)2HESCO Block (Large) (27,38)2HESCO Block (Large) (28,38)2Gate (29,38)2HESCO Wall (33,38)2HESCO Block (Large) (37,38)2HESCO Block (Large) (38,38)2Bremer Wall (43,38)3Barbed Wire (15,39)Bremer Wall (17,39)3Bremer Wall (43,39)3Bremer Wall (17,40)3Bremer Wall (43,40)3Barbed Wire (15,41)Bremer Wall (17,41)3Bremer Wall (43,41)3Bremer Wall (17,42)3Bremer Wall (43,42)3Bremer Wall (17,43)3Bremer Wall (18,43)3Bremer Wall (19,43)3Bremer Wall (20,43)3Bremer Wall (21,43)3Bremer Wall (22,43)3Bremer Wall (23,43)3Bremer Wall (24,43)3Bremer Wall (25,43)3Bremer Wall (26,43)3Bremer Wall (27,43)3Bremer Wall (28,43)3Bremer Wall (29,43)3Bremer Wall (30,43)3Bremer Wall (31,43)3Bremer Wall (32,43)3Bremer Wall (33,43)3Bremer Wall (34,43)3Bremer Wall (35,43)3Bremer Wall (36,43)3Bremer Wall (37,43)3Bremer Wall (38,43)3Bremer Wall (39,43)3Bremer Wall (40,43)3Bremer Wall (41,43)3Bremer Wall (42,43)3Bremer Wall (43,43)3Barbed Wire (17,45)Barbed Wire (19,45)Barbed Wire (21,45)Barbed Wire (23,45)Barbed Wire (25,45)Barbed Wire (27,45)Barbed Wire (29,45)Barbed Wire (31,45)Barbed Wire (33,45)Barbed Wire (35,45)Barbed Wire (37,45)Barbed Wire (39,45)Barbed Wire (41,45)Talon 9K-SAM (35,35) z571 cell = 1.5 m
Team · 10–15 Players · Large hammer

Team Layered Citadel: Bremer Shell, HESCO Core, Every Emplacement

A 27×27 Bremer shell around a 17×17 HESCO ring with a four-cell vehicle lane between them, gates offset by 90°, bunkers, Talon tower, mortar pit and Stingray nest. The all-in base for a full team with ten hammers.

3,771 → ≈5,028 · 3 pallets · $11,500

Blueprint, top-down view26 pieces on a 14 × 18 cell grid (1 cell = 1.5 m).Barbed Wire (16,14)Barbed Wire (18,14)Barbed Wire (20,14)Barbed Wire (22,14)Hedgehog (15,15)Hedgehog (25,15)HESCO Wall (16,16)2HESCO Wall (20,16)2HESCO Block (Large) (24,16)2HESCO Wall (16,17)2HESCO Wall (24,17)2Barbed Wire (26,17)Forward Operating Base (19,19)FOB9Barbed Wire (26,19)HESCO Wall (16,21)2HESCO Block (Large) (22,21)2HESCO Block (Large) (23,21)2HESCO Block (Large) (24,21)2Door (22,22)2Door (24,22)2HESCO Block (Large) (23,23)2HESCO Block (Large) (24,23)2HESCO Wall (17,24)2HESCO Wall (21,24)2Hedgehog (15,25)Hedgehog (25,25)1 cell = 1.5 m
Solo · 1–2 Players · Medium hammer

Solo Pocket FOB

A one-player FOB built entirely from the kit's 1,250 starting stock: 9×9 HESCO ring, corner door, infantry airlock, hedgehogs and wire.

520 → ≈693 · 1 pallets · $7,560