Skip to content
FOBplans

Base · Solo · 693 supplies · Medium hammer

Solo Pocket FOB

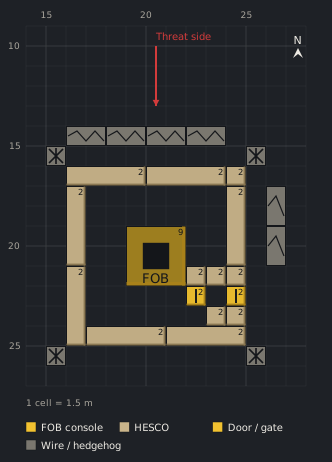
A one-player FOB built entirely from the kit's 1,250 starting stock: 9×9 HESCO ring, corner door, infantry airlock, hedgehogs and wire.

Data only· Patch 0.11· Sep 18, 2026Updated Sep 18, 2026
  • 1–2 Players
  • Medium hammer · from kit
  • Support level 3
  • FOB required
  • 22 min
  • Support · placer
Build modeDownload PNG
Generated preview1 cell = 1.5 m
Blueprint, top-down view26 pieces on a 14 × 18 cell grid (1 cell = 1.5 m).15202510152025Barbed Wire (16,14)Barbed Wire (18,14)Barbed Wire (20,14)Barbed Wire (22,14)Hedgehog (15,15)Hedgehog (25,15)HESCO Wall (16,16)2HESCO Wall (20,16)2HESCO Block (Large) (24,16)2HESCO Wall (16,17)2HESCO Wall (24,17)2Barbed Wire (26,17)Forward Operating Base (19,19)FOB9Barbed Wire (26,19)HESCO Wall (16,21)2HESCO Block (Large) (22,21)2HESCO Block (Large) (23,21)2HESCO Block (Large) (24,21)2Door (22,22)2Door (24,22)2HESCO Block (Large) (23,23)2HESCO Block (Large) (24,23)2HESCO Wall (17,24)2HESCO Wall (21,24)2Hedgehog (15,25)Hedgehog (25,25)Threat side1 cell = 1.5 mFOB consoleHESCODoor / gateWire / hedgehog
520 menu · ≈693
Show as table
#Structurex,yzPhase
consoleForward Operating Base19,1901
wall-aHESCO Wall16,1601
wall-bHESCO Wall20,1601
corner-neHESCO Block (Large)24,1601
wall-cHESCO Wall24,1701
wall-fHESCO Wall16,1702
wall-gHESCO Wall16,2102
wall-dHESCO Wall17,2402
wall-eHESCO Wall21,2402
block-e1HESCO Block (Large)24,2102
door-outerDoor24,2202
block-e2HESCO Block (Large)24,2302
airlock-nHESCO Block (Large)23,2103
airlock-sHESCO Block (Large)23,2303
airlock-wHESCO Block (Large)22,2103
door-innerDoor22,2203
hog-nwHedgehog15,1504
hog-neHedgehog25,1504
hog-swHedgehog15,2504
hog-seHedgehog25,2504
wire-n1Barbed Wire16,1404
wire-n2Barbed Wire18,1404
wire-n3Barbed Wire20,1404
wire-n4Barbed Wire22,1404
wire-e1Barbed Wire26,1704
wire-e2Barbed Wire26,1904

Cost

Menu
520 supplies
≈ To finish
693–725 ‡
Starting stock
1,250 · Covered by the kit stock
Pallets
1 (0 extra)
Ural trips
0
Cash per match
$7,560
Builders
2

‡ contains disputed values

Modules used

Parts list

StructureQtyEachMenu≈ To finishHammer
Phase 01 · 152 → ≈203
HESCO Wall346138≈184Medium hammer
HESCO Block (Large)114 (18)14≈19Medium hammer
Forward Operating Base1300≈0Small hammer
Phase 02 · 226 → ≈301
HESCO Wall446184≈245Medium hammer
HESCO Block (Large)214 (18)28≈37Medium hammer
Door11414≈19Medium hammer
Phase 03 · 56 → ≈75
HESCO Block (Large)314 (18)42≈56Medium hammer
Door11414≈19Medium hammer
Phase 04 · 86 → ≈115
Hedgehog41456≈75Small hammer
Barbed Wire6530≈40Small hammer · $60
Total26520≈693Medium hammer

Build phases

The Pocket FOB is the cheapest complete base in WARDOGS: everything comes out of the kit you already bought. 520 supplies on the menu, about 693 to finish, and 1,250 in the console when you deploy it. What is left over pays for repairs or the optional second layer.

Place the FOB in a walled lot or a warehouse yard at least 120 m from any other FOB, not inside a building and not flush against a map wall (that creates dead zones you cannot see into). Face the threat side north in this plan; rotate the whole layout if the approach comes from elsewhere.

Phase 01

Threat face

Deploy the FOB from your quick slot and take the Medium hammer out of the console. Place three HESCO Walls on the side the enemy will come from, four cells north of the console: two along the top row, one down the eastern edge, with a single Large block filling the corner. The console is screened while you keep building, and the yellow X markers on a wall are easy to reach from inside.

Phase 02

Close the ring

Close the 9×9 ring with four more walls (west edge and south row) and two Large blocks. The outer door goes on the eastern edge near the south corner, the corner farthest from the approach, and it is offset by two cells so nobody outside can see the console through it. Finish every wall to 100% before you stack anything on it.

Phase 03

Airlock

Inside the ring, three Large blocks and a second door form an L behind the outer door. Attackers who breach the outer door stand in a one-cell vestibule facing another team-only door. Never leave both open at the same time.

Phase 04

Outer works

Switch to the Small hammer for the cheap pieces. A hedgehog on each outside corner keeps vehicle roofs away from the wall, six lengths of barbed wire cover the two exposed faces. Both need no FOB, so you can even place them before the console if you carry supplies.

Variant: second layer

When both north walls read 100%, stack two more HESCO Walls on them (+92 supplies, about 123 to finish). Four block heights cannot be climbed from a vehicle roof.

Weaknesses and counters

Single-layer walls (8 C4 per HESCO Wall)
Add the second-layer variant on the threat face as soon as the base walls read 100%.
Vehicle roof-jump over two block heights
Hedgehogs on every corner keep vehicle roofs out of jumping range; the second layer makes the north face four blocks high.
Console hack while a door is held open
Doors auto-close after about 60 seconds. Never leave both airlock doors open at once.
No overwatch
A Recon Tower is the first Large-hammer extension when a teammate with Support 8 arrives.

Engine notes

  • Confirm the kit Medium hammer works below Support 3.
  • Confirm the console fits the 7×7 interior with room to walk around it.
  • Confirm the starting Build stock is exactly 1,250.
  • HAMMER_ESCALATION · phase 4
  • DISPUTED_VALUE
  • DISPUTED_VALUE

In-game proof

No in-game proof yet. Built it? Send a screenshot.

Sources

  • skycoach-building
  • keengamer-fob
  • steam-skivin
  • fobplans-research
  • Verified on Sep 18, 2026, Patch 0.11 · Methodology

Warehouse · Flat · Budget · Spawn shield · Recon outpost · Defensive

Related blueprints

Blueprint, top-down view58 pieces on a 17 × 26 cell grid (1 cell = 1.5 m).Barbed Wire (24,22)Barbed Wire (26,22)Barbed Wire (28,22)Barbed Wire (30,22)Barbed Wire (32,22)Barbed Wire (34,22)Barbed Wire (22,24)HESCO Wall (24,24)2HESCO Wall (28,24)2HESCO Wall (32,24)2HESCO Block (Large) (36,24)2HESCO Wall (24,25)2HESCO Block (Large) (28,25)2HESCO Block (Large) (29,25)2HESCO Block (Large) (30,25)2HESCO Block (Large) (31,25)2HESCO Block (Large) (32,25)2HESCO Wall (36,25)2Barbed Wire (22,26)HESCO Block (Large) (28,26)2Forward Operating Base (29,26)FOB9HESCO Block (Large) (32,26)2Door (28,27)2HESCO Block (Large) (32,27)2Barbed Wire (22,28)HESCO Block (Large) (28,28)2HESCO Block (Large) (32,28)2HESCO Wall (24,29)2HESCO Block (Large) (28,29)2HESCO Block (Large) (29,29)2HESCO Block (Large) (30,29)2HESCO Block (Large) (31,29)2HESCO Block (Large) (32,29)2HESCO Block (Large) (36,29)2Barbed Wire (22,30)HESCO Block (Large) (36,30)2HESCO Wall (27,31)2Gate (28,31)2HESCO Wall (32,31)2HESCO Block (Large) (36,31)2Barbed Wire (22,32)Door (36,32)2HESCO Block (Large) (24,33)2HESCO Block (Large) (36,33)2Barbed Wire (22,34)HESCO Block (Large) (24,34)2HESCO Block (Large) (36,34)2HESCO Block (Large) (24,35)2HESCO Block (Large) (27,35)2HESCO Block (Large) (32,35)2HESCO Block (Large) (36,35)2HESCO Wall (24,36)2Gate (28,36)2HESCO Wall (32,36)2HESCO Block (Large) (36,36)2Hedgehog (25,39)Hedgehog (31,39)Hedgehog (28,41)1 cell = 1.5 m
Duo · 2–3 Players · Medium hammer

Duo FOB Core with Vehicle Gate Airlock

Two players, one truck: a boxed console inside a 13×13 ring with a two-gate vehicle airlock, slalom and wire. The base every logistics run starts from.

1,086 → ≈1,448 · 1 pallets · $8,020

Blueprint, top-down view55 pieces on a 17 × 21 cell grid (1 cell = 1.5 m).Barbed Wire (24,22)Barbed Wire (26,22)Barbed Wire (28,22)Barbed Wire (30,22)Barbed Wire (32,22)Barbed Wire (34,22)HESCO Wall (24,24)2HESCO Wall (28,24)2HESCO Wall (32,24)2HESCO Block (Large) (36,24)2Barbed Wire (38,24)HESCO Wall (24,25)2Recon Tower (25,25)5HESCO Block (Large) (29,25)2HESCO Wall (36,25)2Door (30,26)2Barbed Wire (38,26)HESCO Block (Large) (30,27)2HESCO Block (Large) (29,28)2Barbed Wire (38,28)HESCO Block (Large) (24,29)2HESCO Wall (36,29)2HESCO Block (Large) (24,30)2HESCO Block (Large) (28,30)2HESCO Block (Large) (29,30)2HESCO Block (Large) (30,30)2HESCO Block (Large) (31,30)2HESCO Block (Large) (32,30)2Barbed Wire (38,30)HESCO Block (Large) (24,31)2HESCO Block (Large) (28,31)2Forward Operating Base (29,31)FOB9HESCO Block (Large) (32,31)2Door (24,32)2HESCO Block (Large) (28,32)2HESCO Block (Large) (32,32)2Barbed Wire (38,32)HESCO Block (Large) (24,33)2HESCO Block (Large) (28,33)2HESCO Block (Large) (32,33)2HESCO Block (Large) (36,33)2HESCO Block (Large) (24,34)2HESCO Block (Large) (28,34)2HESCO Block (Large) (29,34)2Door (30,34)2HESCO Block (Large) (31,34)2HESCO Block (Large) (32,34)2HESCO Block (Large) (36,34)2Barbed Wire (38,34)HESCO Block (Large) (24,35)2HESCO Block (Large) (36,35)2HESCO Wall (24,36)2HESCO Wall (28,36)2HESCO Wall (32,36)2HESCO Block (Large) (36,36)21 cell = 1.5 m
Duo · 2–3 Players · Large hammer

Duo Overwatch Tower with Ladder Kill Box

A Recon Tower in the corner of a 13×13 ring, its ladder boxed with blocks and a door, wire on the blind faces. Two Support players, one with the Large hammer.

983 → ≈1,311 · 1 pallets · $10,420

Blueprint, top-down view20 pieces on a 13 × 13 cell grid (1 cell = 1.5 m).HESCO Wall (15,15)2HESCO Wall (19,15)2HESCO Block (Large) (23,15)2HESCO Block (Large) (24,15)2HESCO Block (Large) (25,15)2HESCO Wall (15,16)2HESCO Wall (25,16)2Forward Operating Base (19,19)FOB9HESCO Wall (15,20)2HESCO Block (Large) (25,20)2HESCO Block (Large) (25,21)2HESCO Block (Large) (25,22)2Door (25,23)2HESCO Block (Large) (15,24)2HESCO Block (Large) (25,24)2HESCO Wall (15,25)2HESCO Wall (19,25)2HESCO Block (Large) (23,25)2HESCO Block (Large) (24,25)2HESCO Block (Large) (25,25)21 cell = 1.5 m
Duo · 2–4 Players · Medium hammer

11×11 HESCO ring

The standard perimeter: seven walls, eleven large blocks and one door around an 11×11 footprint, 490 supplies on the menu.

490 → ≈653 · 1 pallets · $7,500

DefensiveData only
Blueprint, top-down view6 pieces on a 11 × 6 cell grid (1 cell = 1.5 m).HESCO Block (Large) (23,18)2Recon Tower (24,18)5Forward Operating Base (19,19)FOB9Door (22,19)2HESCO Block (Large) (22,20)2HESCO Block (Large) (23,21)21 cell = 1.5 m
Duo · 2–4 Players · Large hammer

Recon tower with ladder kill box

A Recon Tower whose ladder is boxed in with three blocks and a door, so attackers climb single file into your muzzle. 61 + 56 supplies.

117 → ≈156 · 1 pallets · $9,900