Skip to content
FOBplans

Module · Solo · 67 supplies · Small hammer

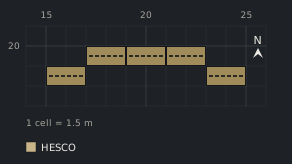
Sandbag firing arc

Five sandbag walls in a shallow arc: three firing positions to shift between, no FOB, 50 supplies.

Data only· Patch 0.11· Sep 18, 2026Updated Sep 18, 2026
  • 1 Players
  • Small hammer
  • No FOB needed
  • 3 min
  • Any · placer
Build modeDownload PNG
Generated preview1 cell = 1.5 m
Blueprint, top-down view5 pieces on a 12 × 4 cell grid (1 cell = 1.5 m).15202520Sandbag Wall (17,20)Sandbag Wall (19,20)Sandbag Wall (21,20)Sandbag Wall (15,21)Sandbag Wall (23,21)1 cell = 1.5 mHESCO
50 menu · ≈67
Show as table
#Structurex,yzPhase
sb-1Sandbag Wall15,2101
sb-2Sandbag Wall17,2001
sb-3Sandbag Wall19,2001
sb-4Sandbag Wall21,2001
sb-5Sandbag Wall23,2101

Cost

Menu
50 supplies
≈ To finish
≈67
Cash per match
$1,170
One-time unlocks
$35,000
Builders
1

Modules used

Parts list

StructureQtyEachMenu≈ To finishHammer
Phase 01 · 50 → ≈67
Sandbag Wall51050≈67Small hammer
Total550≈67Small hammer

Build phases

Sandbags have 735 HP and die to one C4 or any vehicle gun. They are for moving between, not for holding. The arc gives you three positions on a ridge for the price of one wall.

Phase 01

Arc

Five sandbag walls, the outer two one cell back, all on the crest facing downhill.

In-game proof

No in-game proof yet. Built it? Send a screenshot.

Sources

  • steam-skivin
  • allthings-cluster
  • wardogs-zone-db
  • fobplans-research
  • Verified on Sep 18, 2026, Patch 0.11 · Methodology

Ridge · Ridge · Recon outpost · Budget

Related blueprints

Blueprint, top-down view55 pieces on a 17 × 21 cell grid (1 cell = 1.5 m).Barbed Wire (24,22)Barbed Wire (26,22)Barbed Wire (28,22)Barbed Wire (30,22)Barbed Wire (32,22)Barbed Wire (34,22)HESCO Wall (24,24)2HESCO Wall (28,24)2HESCO Wall (32,24)2HESCO Block (Large) (36,24)2Barbed Wire (38,24)HESCO Wall (24,25)2Recon Tower (25,25)5HESCO Block (Large) (29,25)2HESCO Wall (36,25)2Door (30,26)2Barbed Wire (38,26)HESCO Block (Large) (30,27)2HESCO Block (Large) (29,28)2Barbed Wire (38,28)HESCO Block (Large) (24,29)2HESCO Wall (36,29)2HESCO Block (Large) (24,30)2HESCO Block (Large) (28,30)2HESCO Block (Large) (29,30)2HESCO Block (Large) (30,30)2HESCO Block (Large) (31,30)2HESCO Block (Large) (32,30)2Barbed Wire (38,30)HESCO Block (Large) (24,31)2HESCO Block (Large) (28,31)2Forward Operating Base (29,31)FOB9HESCO Block (Large) (32,31)2Door (24,32)2HESCO Block (Large) (28,32)2HESCO Block (Large) (32,32)2Barbed Wire (38,32)HESCO Block (Large) (24,33)2HESCO Block (Large) (28,33)2HESCO Block (Large) (32,33)2HESCO Block (Large) (36,33)2HESCO Block (Large) (24,34)2HESCO Block (Large) (28,34)2HESCO Block (Large) (29,34)2Door (30,34)2HESCO Block (Large) (31,34)2HESCO Block (Large) (32,34)2HESCO Block (Large) (36,34)2Barbed Wire (38,34)HESCO Block (Large) (24,35)2HESCO Block (Large) (36,35)2HESCO Wall (24,36)2HESCO Wall (28,36)2HESCO Wall (32,36)2HESCO Block (Large) (36,36)21 cell = 1.5 m
Duo · 2–3 Players · Large hammer

Duo Overwatch Tower with Ladder Kill Box

A Recon Tower in the corner of a 13×13 ring, its ladder boxed with blocks and a door, wire on the blind faces. Two Support players, one with the Large hammer.

983 → ≈1,311 · 1 pallets · $10,420

Blueprint, top-down view4 pieces on a 6 × 9 cell grid (1 cell = 1.5 m).Sandbag Wall (19,18)Sandbag Wall (21,18)Recon Tent (20,20)Barbed Wire (20,24)1 cell = 1.5 m
Solo · 1 Players · Small hammer

Recon nest

Recon tent, two sandbag walls and one wire: a 30-supply observation post that hides you from thermal optics. No FOB.

30 → ≈40 · 1 pallets · $910

Blueprint, top-down view6 pieces on a 11 × 6 cell grid (1 cell = 1.5 m).HESCO Block (Large) (23,18)2Recon Tower (24,18)5Forward Operating Base (19,19)FOB9Door (22,19)2HESCO Block (Large) (22,20)2HESCO Block (Large) (23,21)21 cell = 1.5 m
Duo · 2–4 Players · Large hammer

Recon tower with ladder kill box

A Recon Tower whose ladder is boxed in with three blocks and a door, so attackers climb single file into your muzzle. 61 + 56 supplies.

117 → ≈156 · 1 pallets · $9,900

Blueprint, top-down view26 pieces on a 14 × 18 cell grid (1 cell = 1.5 m).Barbed Wire (16,14)Barbed Wire (18,14)Barbed Wire (20,14)Barbed Wire (22,14)Hedgehog (15,15)Hedgehog (25,15)HESCO Wall (16,16)2HESCO Wall (20,16)2HESCO Block (Large) (24,16)2HESCO Wall (16,17)2HESCO Wall (24,17)2Barbed Wire (26,17)Forward Operating Base (19,19)FOB9Barbed Wire (26,19)HESCO Wall (16,21)2HESCO Block (Large) (22,21)2HESCO Block (Large) (23,21)2HESCO Block (Large) (24,21)2Door (22,22)2Door (24,22)2HESCO Block (Large) (23,23)2HESCO Block (Large) (24,23)2HESCO Wall (17,24)2HESCO Wall (21,24)2Hedgehog (15,25)Hedgehog (25,25)1 cell = 1.5 m
Solo · 1–2 Players · Medium hammer

Solo Pocket FOB

A one-player FOB built entirely from the kit's 1,250 starting stock: 9×9 HESCO ring, corner door, infantry airlock, hedgehogs and wire.

520 → ≈693 · 1 pallets · $7,560