Skip to content
FOBplans

Base · Duo · 1,311 supplies · Large hammer

Duo Overwatch Tower with Ladder Kill Box

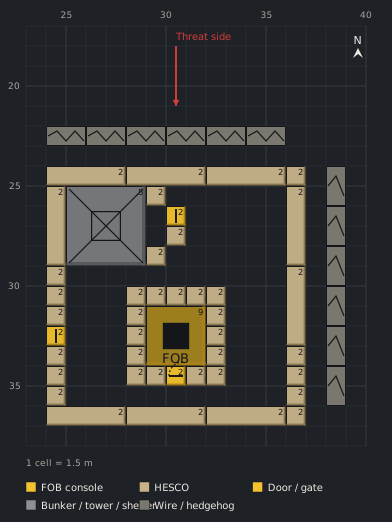
A Recon Tower in the corner of a 13×13 ring, its ladder boxed with blocks and a door, wire on the blind faces. Two Support players, one with the Large hammer.

Data only· Patch 0.11· Sep 18, 2026Updated Sep 18, 2026
  • 2–3 Players
  • Large hammer
  • Support level 8
  • FOB required
  • 30 min
  • Support 8 · placer
  • Support 3 · finishers
Build modeDownload PNG
Generated preview1 cell = 1.5 m
Blueprint, top-down view55 pieces on a 17 × 21 cell grid (1 cell = 1.5 m).2530354020253035Barbed Wire (24,22)Barbed Wire (26,22)Barbed Wire (28,22)Barbed Wire (30,22)Barbed Wire (32,22)Barbed Wire (34,22)HESCO Wall (24,24)2HESCO Wall (28,24)2HESCO Wall (32,24)2HESCO Block (Large) (36,24)2Barbed Wire (38,24)HESCO Wall (24,25)2Recon Tower (25,25)5HESCO Block (Large) (29,25)2HESCO Wall (36,25)2Door (30,26)2Barbed Wire (38,26)HESCO Block (Large) (30,27)2HESCO Block (Large) (29,28)2Barbed Wire (38,28)HESCO Block (Large) (24,29)2HESCO Wall (36,29)2HESCO Block (Large) (24,30)2HESCO Block (Large) (28,30)2HESCO Block (Large) (29,30)2HESCO Block (Large) (30,30)2HESCO Block (Large) (31,30)2HESCO Block (Large) (32,30)2Barbed Wire (38,30)HESCO Block (Large) (24,31)2HESCO Block (Large) (28,31)2Forward Operating Base (29,31)FOB9HESCO Block (Large) (32,31)2Door (24,32)2HESCO Block (Large) (28,32)2HESCO Block (Large) (32,32)2Barbed Wire (38,32)HESCO Block (Large) (24,33)2HESCO Block (Large) (28,33)2HESCO Block (Large) (32,33)2HESCO Block (Large) (36,33)2HESCO Block (Large) (24,34)2HESCO Block (Large) (28,34)2HESCO Block (Large) (29,34)2Door (30,34)2HESCO Block (Large) (31,34)2HESCO Block (Large) (32,34)2HESCO Block (Large) (36,34)2Barbed Wire (38,34)HESCO Block (Large) (24,35)2HESCO Block (Large) (36,35)2HESCO Wall (24,36)2HESCO Wall (28,36)2HESCO Wall (32,36)2HESCO Block (Large) (36,36)2Threat side1 cell = 1.5 mFOB consoleHESCODoor / gateBunker / tower / shelterWire / hedgehog
983 menu · ≈1,311
Show as table
#Structurex,yzPhase
consoleForward Operating Base29,3101
cbox-n0-n1HESCO Block (Large)28,3001
cbox-n0-n2HESCO Block (Large)29,3001
cbox-n0-n3HESCO Block (Large)30,3001
cbox-n0-n4HESCO Block (Large)31,3001
cbox-n0-n5HESCO Block (Large)32,3001
cbox-e0-e1HESCO Block (Large)32,3101
cbox-e0-e2HESCO Block (Large)32,3201
cbox-e0-e3HESCO Block (Large)32,3301
cbox-s-door-s2Door30,3401
cbox-s0-s1HESCO Block (Large)28,3401
cbox-s0-s2HESCO Block (Large)29,3401
cbox-s1-s1HESCO Block (Large)31,3401
cbox-s1-s2HESCO Block (Large)32,3401
cbox-w0-w1HESCO Block (Large)28,3101
cbox-w0-w2HESCO Block (Large)28,3201
cbox-w0-w3HESCO Block (Large)28,3301
towerRecon Tower25,2502
tower-lb1HESCO Block (Large)29,2503
tower-lb2HESCO Block (Large)29,2803
tower-lb3HESCO Block (Large)30,2703
tower-ld1Door30,2603
ring-n0-n1HESCO Wall24,2404
ring-n0-n2HESCO Wall28,2404
ring-n0-n3HESCO Wall32,2404
ring-n0-n4HESCO Block (Large)36,2404
ring-e0-e1HESCO Wall36,2504
ring-e0-e2HESCO Wall36,2904
ring-e0-e3HESCO Block (Large)36,3304
ring-e0-e4HESCO Block (Large)36,3404
ring-e0-e5HESCO Block (Large)36,3504
ring-s0-s1HESCO Wall24,3604
ring-s0-s2HESCO Wall28,3604
ring-s0-s3HESCO Wall32,3604
ring-s0-s4HESCO Block (Large)36,3604
ring-w-door-w8Door24,3204
ring-w0-w1HESCO Wall24,2504
ring-w0-w2HESCO Block (Large)24,2904
ring-w0-w3HESCO Block (Large)24,3004
ring-w0-w4HESCO Block (Large)24,3104
ring-w1-w1HESCO Block (Large)24,3304
ring-w1-w2HESCO Block (Large)24,3404
ring-w1-w3HESCO Block (Large)24,3504
wire-n1Barbed Wire24,2205
wire-n2Barbed Wire26,2205
wire-n3Barbed Wire28,2205
wire-n4Barbed Wire30,2205
wire-n5Barbed Wire32,2205
wire-n6Barbed Wire34,2205
wire-e7Barbed Wire38,2405
wire-e8Barbed Wire38,2605
wire-e9Barbed Wire38,2805
wire-e10Barbed Wire38,3005
wire-e11Barbed Wire38,3205
wire-e12Barbed Wire38,3405

Cost

Menu
983 supplies
≈ To finish
1,311–1,601 ‡
Starting stock
1,250
Pallets
1 (1 extra)
Ural trips
1
Cash per match
$10,420
One-time unlocks
$110,000
Builders
3

‡ contains disputed values

Modules used

Parts list

StructureQtyEachMenu≈ To finishHammer
Phase 01 · 224 → ≈299
HESCO Block (Large)1514 (18)210≈280Medium hammer
Door11414≈19Medium hammer
Forward Operating Base1300≈0Small hammer
Phase 02 · 61 → ≈81
Recon Tower161 (163)61≈81Large hammer
Phase 03 · 56 → ≈75
HESCO Block (Large)314 (18)42≈56Medium hammer
Door11414≈19Medium hammer
Phase 04 · 582 → ≈776
HESCO Wall946414≈552Medium hammer
HESCO Block (Large)1114 (18)154≈205Medium hammer
Door11414≈19Medium hammer
Phase 05 · 60 → ≈80
Barbed Wire12560≈80Small hammer · $120
Total55983≈1,311Large hammer

Build phases

The tower is placed by the Support 8 player and finished by both. Its ladder faces east into the base, and the ladder box means anyone who gets over the ring still has to open a door under the deck.

Phase 01

Console box

Deploy the FOB, take the Medium hammer from the console and box the console with large blocks before anything else. The 30-second console hack is the fastest way to lose the whole base.

Phase 02

Tower

Recon Tower in the north-west corner, ladder facing east into the base. Both hammers on the yellow X until it reads 100%.

Phase 03

Ladder box

Three large blocks and a door around the ladder base.

Phase 04

Ring

The 13×13 ring with its door on the west face, offset from the ladder box.

Phase 05

Wire

Wire on the north and east faces.

Weaknesses and counters

Walls are 8 C4 while the tower is 14
Second wall layer next; the tower itself is the strong point.
Snipers on the deck occupants
Crouch on the deck and use the parapet; a Talon up there later gives the deck a job.

Engine notes

  • Confirm doors can be placed against the tower face and the ladder box dimensions.
  • HAMMER_ESCALATION · phase 3
  • HAMMER_ESCALATION · phase 4
  • HAMMER_ESCALATION · phase 5
  • DISPUTED_VALUE
  • DISPUTED_VALUE
  • DISPUTED_VALUE

In-game proof

No in-game proof yet. Built it? Send a screenshot.

Sources

  • steam-skivin
  • steam-cheekbuster
  • allthings-cluster
  • keengamer-fob
  • wardogs-zone-db
  • fobplans-research
  • Verified on Sep 18, 2026, Patch 0.11 · Methodology

Ridge · Flat · Recon outpost · Tower lock · Defensive

Related blueprints

Blueprint, top-down view85 pieces on a 20 × 24 cell grid (1 cell = 1.5 m).Barbed Wire (23,21)Barbed Wire (25,21)Barbed Wire (27,21)Barbed Wire (29,21)Barbed Wire (31,21)Barbed Wire (33,21)Barbed Wire (35,21)Hedgehog (22,22)Hedgehog (38,22)HESCO Wall (23,23)2HESCO Wall (27,23)2HESCO Wall (31,23)2HESCO Block (Large) (35,23)2HESCO Block (Large) (36,23)2HESCO Block (Large) (37,23)2Barbed Wire (39,23)HESCO Wall (23,24)2Recon Tower (24,24)5HESCO Wall (37,24)2Barbed Wire (39,25)Barbed Wire (39,27)HESCO Block (Large) (23,28)2HESCO Block (Large) (24,28)2HESCO Block (Large) (27,28)2HESCO Block (Large) (30,28)2HESCO Block (Large) (31,28)2HESCO Block (Large) (32,28)2HESCO Block (Large) (33,28)2HESCO Block (Large) (34,28)2HESCO Wall (37,28)2HESCO Block (Large) (23,29)2Door (25,29)2HESCO Block (Large) (26,29)2HESCO Block (Large) (30,29)2Forward Operating Base (31,29)FOB9HESCO Block (Large) (34,29)2Barbed Wire (39,29)HESCO Block (Large) (23,30)2HESCO Block (Large) (30,30)2HESCO Block (Large) (34,30)2Door (23,31)2HESCO Block (Large) (30,31)2HESCO Block (Large) (34,31)2Barbed Wire (39,31)HESCO Wall (23,32)2HESCO Block (Large) (30,32)2HESCO Block (Large) (31,32)2Door (32,32)2HESCO Block (Large) (33,32)2HESCO Block (Large) (34,32)2HESCO Wall (37,32)2HESCO Block (Large) (32,33)2HESCO Block (Large) (33,33)2HESCO Block (Large) (34,33)2HESCO Block (Large) (35,33)2Barbed Wire (39,33)HESCO Block (Large) (30,34)2HESCO Block (Large) (31,34)2HESCO Block (Large) (32,34)2HESCO Block (Large) (33,34)2HESCO Block (Large) (34,34)2HESCO Block (Large) (35,34)2Door (30,35)2HESCO Block (Large) (31,35)2HESCO Block (Large) (32,35)2HESCO Block (Large) (33,35)2HESCO Block (Large) (34,35)2HESCO Block (Large) (35,35)2Barbed Wire (39,35)HESCO Block (Large) (23,36)2HESCO Block (Large) (32,36)2HESCO Block (Large) (33,36)2HESCO Block (Large) (34,36)2HESCO Block (Large) (35,36)2HESCO Block (Large) (37,36)2HESCO Wall (23,37)2HESCO Wall (27,37)2HESCO Wall (31,37)2HESCO Block (Large) (35,37)2HESCO Block (Large) (36,37)2HESCO Block (Large) (37,37)2Hedgehog (22,38)Hedgehog (38,38)Vanguard CIWS (32,33) z24Talon 9K-SAM (25,25) z571 cell = 1.5 m
Squad · 4–6 Players · Large hammer

Squad AA Nest: Talon on Tower Deck + CIWS Platform

A Talon on a boxed Recon Tower and a Vanguard CIWS on a 4×4 platform with operator box, inside a 15×15 ring. Two Support 8 players, one Driver hauling Ammo.

2,923 → ≈3,897 · 3 pallets · $10,840

Blueprint, top-down view4 pieces on a 6 × 9 cell grid (1 cell = 1.5 m).Sandbag Wall (19,18)Sandbag Wall (21,18)Recon Tent (20,20)Barbed Wire (20,24)1 cell = 1.5 m
Solo · 1 Players · Small hammer

Recon nest

Recon tent, two sandbag walls and one wire: a 30-supply observation post that hides you from thermal optics. No FOB.

30 → ≈40 · 1 pallets · $910

Blueprint, top-down view5 pieces on a 12 × 4 cell grid (1 cell = 1.5 m).Sandbag Wall (17,20)Sandbag Wall (19,20)Sandbag Wall (21,20)Sandbag Wall (15,21)Sandbag Wall (23,21)1 cell = 1.5 m
Solo · 1 Players · Small hammer

Sandbag firing arc

Five sandbag walls in a shallow arc: three firing positions to shift between, no FOB, 50 supplies.

50 → ≈67 · 1 pallets · $1,170

Blueprint, top-down view26 pieces on a 14 × 18 cell grid (1 cell = 1.5 m).Barbed Wire (16,14)Barbed Wire (18,14)Barbed Wire (20,14)Barbed Wire (22,14)Hedgehog (15,15)Hedgehog (25,15)HESCO Wall (16,16)2HESCO Wall (20,16)2HESCO Block (Large) (24,16)2HESCO Wall (16,17)2HESCO Wall (24,17)2Barbed Wire (26,17)Forward Operating Base (19,19)FOB9Barbed Wire (26,19)HESCO Wall (16,21)2HESCO Block (Large) (22,21)2HESCO Block (Large) (23,21)2HESCO Block (Large) (24,21)2Door (22,22)2Door (24,22)2HESCO Block (Large) (23,23)2HESCO Block (Large) (24,23)2HESCO Wall (17,24)2HESCO Wall (21,24)2Hedgehog (15,25)Hedgehog (25,25)1 cell = 1.5 m
Solo · 1–2 Players · Medium hammer

Solo Pocket FOB

A one-player FOB built entirely from the kit's 1,250 starting stock: 9×9 HESCO ring, corner door, infantry airlock, hedgehogs and wire.

520 → ≈693 · 1 pallets · $7,560