Skip to content
FOBplans

Module · Duo · 156 supplies · Large hammer

Recon tower with ladder kill box

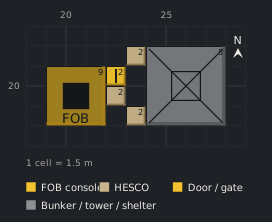
A Recon Tower whose ladder is boxed in with three blocks and a door, so attackers climb single file into your muzzle. 61 + 56 supplies.

Data only· Patch 0.11· Sep 18, 2026Updated Sep 18, 2026
  • 2–4 Players
  • Large hammer
  • Support level 8
  • FOB required
  • 12 min
  • Support 8 · placer
  • Any · finishers
Build modeDownload PNG
Generated preview1 cell = 1.5 m
Blueprint, top-down view6 pieces on a 11 × 6 cell grid (1 cell = 1.5 m).202520HESCO Block (Large) (23,18)2Recon Tower (24,18)5Forward Operating Base (19,19)FOB9Door (22,19)2HESCO Block (Large) (22,20)2HESCO Block (Large) (23,21)21 cell = 1.5 mFOB consoleHESCODoor / gateBunker / tower / shelter
117 menu · ≈156
Show as table
#Structurex,yzPhase
consoleForward Operating Base19,1901
towerRecon Tower24,1802
tower-lb1HESCO Block (Large)23,1803
tower-lb2HESCO Block (Large)23,2103
tower-lb3HESCO Block (Large)22,2003
tower-ld1Door22,1903

Cost

Menu
117 supplies
≈ To finish
156–308 ‡
Starting stock
1,250 · Covered by the kit stock
Pallets
1 (0 extra)
Ural trips
0
Cash per match
$9,900
One-time unlocks
$75,000
Builders
1

‡ contains disputed values

Modules used

Parts list

StructureQtyEachMenu≈ To finishHammer
Phase 01 · 0 → ≈0
Forward Operating Base1300≈0Small hammer
Phase 02 · 61 → ≈81
Recon Tower161 (163)61≈81Large hammer
Phase 03 · 56 → ≈75
HESCO Block (Large)314 (18)42≈56Medium hammer
Door11414≈19Medium hammer
Total6117≈156Large hammer

Build phases

The ladder is the tower’s only entrance, and it is directional. Face it toward your console, finish the tower to 100%, then box the ladder base. Nothing can be placed right next to the ladder while the tower is unfinished.

Phase 01

Console first

Deploy the FOB and take the Medium hammer from the console. Everything below is placed relative to the console at cell 20,20.

Phase 02

Tower

Place the tower four cells from the console with the ladder facing it. Two builders on the yellow X get it to 100% in a couple of minutes.

Phase 03

Kill box

Three large blocks and a door around the ladder base. Whoever opens the door stands in a one-cell box under the deck.

Engine notes

  • HAMMER_ESCALATION · phase 3
  • DISPUTED_VALUE
  • DISPUTED_VALUE
  • DISPUTED_VALUE

In-game proof

No in-game proof yet. Built it? Send a screenshot.

Sources

  • steam-skivin
  • allthings-cluster
  • wardogs-zone-db
  • fobplans-research
  • Verified on Sep 18, 2026, Patch 0.11 · Methodology

Any · Flat · Recon outpost · Defensive

Related blueprints

Blueprint, top-down view26 pieces on a 14 × 18 cell grid (1 cell = 1.5 m).Barbed Wire (16,14)Barbed Wire (18,14)Barbed Wire (20,14)Barbed Wire (22,14)Hedgehog (15,15)Hedgehog (25,15)HESCO Wall (16,16)2HESCO Wall (20,16)2HESCO Block (Large) (24,16)2HESCO Wall (16,17)2HESCO Wall (24,17)2Barbed Wire (26,17)Forward Operating Base (19,19)FOB9Barbed Wire (26,19)HESCO Wall (16,21)2HESCO Block (Large) (22,21)2HESCO Block (Large) (23,21)2HESCO Block (Large) (24,21)2Door (22,22)2Door (24,22)2HESCO Block (Large) (23,23)2HESCO Block (Large) (24,23)2HESCO Wall (17,24)2HESCO Wall (21,24)2Hedgehog (15,25)Hedgehog (25,25)1 cell = 1.5 m
Solo · 1–2 Players · Medium hammer

Solo Pocket FOB

A one-player FOB built entirely from the kit's 1,250 starting stock: 9×9 HESCO ring, corner door, infantry airlock, hedgehogs and wire.

520 → ≈693 · 1 pallets · $7,560

Blueprint, top-down view85 pieces on a 20 × 24 cell grid (1 cell = 1.5 m).Barbed Wire (23,21)Barbed Wire (25,21)Barbed Wire (27,21)Barbed Wire (29,21)Barbed Wire (31,21)Barbed Wire (33,21)Barbed Wire (35,21)Hedgehog (22,22)Hedgehog (38,22)HESCO Wall (23,23)2HESCO Wall (27,23)2HESCO Wall (31,23)2HESCO Block (Large) (35,23)2HESCO Block (Large) (36,23)2HESCO Block (Large) (37,23)2Barbed Wire (39,23)HESCO Wall (23,24)2Recon Tower (24,24)5HESCO Wall (37,24)2Barbed Wire (39,25)Barbed Wire (39,27)HESCO Block (Large) (23,28)2HESCO Block (Large) (24,28)2HESCO Block (Large) (27,28)2HESCO Block (Large) (30,28)2HESCO Block (Large) (31,28)2HESCO Block (Large) (32,28)2HESCO Block (Large) (33,28)2HESCO Block (Large) (34,28)2HESCO Wall (37,28)2HESCO Block (Large) (23,29)2Door (25,29)2HESCO Block (Large) (26,29)2HESCO Block (Large) (30,29)2Forward Operating Base (31,29)FOB9HESCO Block (Large) (34,29)2Barbed Wire (39,29)HESCO Block (Large) (23,30)2HESCO Block (Large) (30,30)2HESCO Block (Large) (34,30)2Door (23,31)2HESCO Block (Large) (30,31)2HESCO Block (Large) (34,31)2Barbed Wire (39,31)HESCO Wall (23,32)2HESCO Block (Large) (30,32)2HESCO Block (Large) (31,32)2Door (32,32)2HESCO Block (Large) (33,32)2HESCO Block (Large) (34,32)2HESCO Wall (37,32)2HESCO Block (Large) (32,33)2HESCO Block (Large) (33,33)2HESCO Block (Large) (34,33)2HESCO Block (Large) (35,33)2Barbed Wire (39,33)HESCO Block (Large) (30,34)2HESCO Block (Large) (31,34)2HESCO Block (Large) (32,34)2HESCO Block (Large) (33,34)2HESCO Block (Large) (34,34)2HESCO Block (Large) (35,34)2Door (30,35)2HESCO Block (Large) (31,35)2HESCO Block (Large) (32,35)2HESCO Block (Large) (33,35)2HESCO Block (Large) (34,35)2HESCO Block (Large) (35,35)2Barbed Wire (39,35)HESCO Block (Large) (23,36)2HESCO Block (Large) (32,36)2HESCO Block (Large) (33,36)2HESCO Block (Large) (34,36)2HESCO Block (Large) (35,36)2HESCO Block (Large) (37,36)2HESCO Wall (23,37)2HESCO Wall (27,37)2HESCO Wall (31,37)2HESCO Block (Large) (35,37)2HESCO Block (Large) (36,37)2HESCO Block (Large) (37,37)2Hedgehog (22,38)Hedgehog (38,38)Vanguard CIWS (32,33) z24Talon 9K-SAM (25,25) z571 cell = 1.5 m
Squad · 4–6 Players · Large hammer

Squad AA Nest: Talon on Tower Deck + CIWS Platform

A Talon on a boxed Recon Tower and a Vanguard CIWS on a 4×4 platform with operator box, inside a 15×15 ring. Two Support 8 players, one Driver hauling Ammo.

2,923 → ≈3,897 · 3 pallets · $10,840

Blueprint, top-down view86 pieces on a 21 × 28 cell grid (1 cell = 1.5 m).Barbed Wire (23,21)Barbed Wire (25,21)Barbed Wire (27,21)Barbed Wire (29,21)Barbed Wire (31,21)Barbed Wire (33,21)Barbed Wire (35,21)Hedgehog (22,22)Hedgehog (38,22)Barbed Wire (21,23)HESCO Wall (23,23)2HESCO Wall (27,23)2HESCO Wall (31,23)2HESCO Block (Large) (35,23)2HESCO Block (Large) (36,23)2HESCO Block (Large) (37,23)2Barbed Wire (39,23)HESCO Wall (23,24)2Bunker (24,24)2Bunker (33,24)2HESCO Wall (37,24)2Barbed Wire (21,25)Barbed Wire (39,25)Barbed Wire (21,27)Barbed Wire (39,27)HESCO Wall (23,28)2HESCO Block (Large) (30,28)2HESCO Block (Large) (31,28)2HESCO Block (Large) (32,28)2HESCO Block (Large) (33,28)2HESCO Block (Large) (34,28)2HESCO Wall (37,28)2Barbed Wire (21,29)HESCO Block (Large) (28,29)2HESCO Block (Large) (29,29)2HESCO Block (Large) (30,29)2Forward Operating Base (31,29)FOB9HESCO Block (Large) (34,29)2Barbed Wire (39,29)Door (28,30)2Door (30,30)2HESCO Block (Large) (34,30)2Barbed Wire (21,31)HESCO Block (Large) (28,31)2HESCO Block (Large) (29,31)2HESCO Block (Large) (30,31)2HESCO Block (Large) (34,31)2Barbed Wire (39,31)HESCO Wall (23,32)2HESCO Block (Large) (30,32)2HESCO Block (Large) (31,32)2HESCO Block (Large) (32,32)2HESCO Block (Large) (33,32)2HESCO Block (Large) (34,32)2HESCO Wall (37,32)2Barbed Wire (21,33)HESCO Wall (24,33)2Gate (25,33)2HESCO Wall (29,33)2HESCO Block (Large) (31,33)2Recon Tower (32,33)5Barbed Wire (39,33)Door (30,34)2Barbed Wire (21,35)HESCO Block (Large) (30,35)2Barbed Wire (39,35)HESCO Block (Large) (23,36)2HESCO Block (Large) (31,36)2HESCO Block (Large) (37,36)2HESCO Block (Large) (23,37)2HESCO Block (Large) (24,37)2Gate (25,37)2HESCO Wall (29,37)2HESCO Wall (33,37)2HESCO Block (Large) (37,37)2Hedgehog (22,38)Hedgehog (38,38)Hedgehog (24,40)Hedgehog (30,40)Hedgehog (27,42)HESCO Wall (23,23) z24HESCO Wall (27,23) z24HESCO Wall (31,23) z24HESCO Block (Large) (35,23) z24HESCO Block (Large) (36,23) z24HESCO Block (Large) (37,23) z241 cell = 1.5 m
Squad · 4–6 Players · Large hammer

Squad Hot Zone Bastion (4–6 Players, Two-High Walls)

A 15×15 ring with vehicle airlock, two bunkers covering the far wall, a tower with kill box, a second wall layer on the threat face, hedgehogs and wire. Built to sit in the Hot Zone and stay there.

1,730 → ≈2,307 · 2 pallets · $10,510

Blueprint, top-down view62 pieces on a 18 × 23 cell grid (1 cell = 1.5 m).Barbed Wire (24,22)Barbed Wire (26,22)Barbed Wire (28,22)Barbed Wire (30,22)Barbed Wire (32,22)Barbed Wire (34,22)Hedgehog (23,23)Hedgehog (37,23)HESCO Wall (24,24)2HESCO Wall (28,24)2HESCO Wall (32,24)2HESCO Block (Large) (36,24)2Barbed Wire (38,24)HESCO Wall (24,25)2HESCO Block (Large) (30,25)2HESCO Block (Large) (31,25)2HESCO Block (Large) (32,25)2HESCO Block (Large) (33,25)2HESCO Block (Large) (34,25)2HESCO Wall (36,25)2HESCO Block (Large) (30,26)2Forward Operating Base (31,26)FOB9HESCO Block (Large) (34,26)2Barbed Wire (38,26)HESCO Block (Large) (30,27)2Door (34,27)2HESCO Block (Large) (30,28)2HESCO Block (Large) (34,28)2Barbed Wire (38,28)HESCO Block (Large) (24,29)2HESCO Block (Large) (27,29)2HESCO Block (Large) (30,29)2HESCO Block (Large) (31,29)2HESCO Block (Large) (32,29)2HESCO Block (Large) (33,29)2HESCO Block (Large) (34,29)2HESCO Wall (36,29)2HESCO Block (Large) (24,30)2Indirect Fire Shelter (25,30)3Barbed Wire (38,30)Gate (24,31)2Bunker (31,31)2HESCO Block (Large) (30,32)2Barbed Wire (38,32)HESCO Block (Large) (36,33)2HESCO Block (Large) (36,34)2Barbed Wire (38,34)HESCO Block (Large) (24,35)2Door (27,35)2HESCO Block (Large) (36,35)2HESCO Wall (24,36)2HESCO Wall (28,36)2HESCO Wall (32,36)2HESCO Block (Large) (36,36)2Hedgehog (23,37)Hedgehog (37,37)Barbed Wire (24,38)Barbed Wire (26,38)Barbed Wire (28,38)Barbed Wire (30,38)Barbed Wire (32,38)Barbed Wire (34,38)1 cell = 1.5 m
Squad · 3–6 Players · Large hammer

Squad Spawn Shield: IFS Garage over the Spawn Ural

An Indirect Fire Shelter garages the spawn vehicle right behind the gate of a 13×13 ring, a bunker covers the gate from inside, hedgehogs and wire outside. Teammates spawn on the roof, shells never reach the truck.

1,112 → ≈1,483 · 1 pallets · $10,480