Skip to content
FOBplans

Base · Platoon · 3,664 supplies · Large hammer

Team Tower Lock: Sealing a Map Tower as Team Overwatch

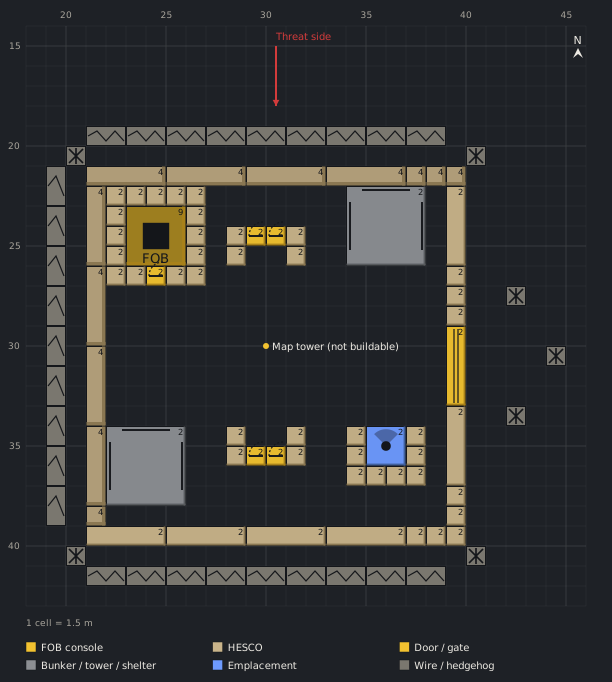
A 19×19 ring around a map tower: two-door vestibules on both ground entrances, corner bunkers, a Talon ground box, two-high walls on the exposed faces. The tower interior is not buildable, so the lock is built outside.

Data only· Patch 0.11· Sep 18, 2026Updated Sep 18, 2026
  • 7–10 Players
  • Large hammer
  • Support level 8
  • FOB required
  • 70 min
  • 2× Support 8 · placer
  • Driver 3 · logistics
  • 4× Any · finishers
Build modeDownload PNG
Generated preview1 cell = 1.5 m
Blueprint, top-down view113 pieces on a 28 × 29 cell grid (1 cell = 1.5 m).202530354045152025303540Barbed Wire (21,19)Barbed Wire (23,19)Barbed Wire (25,19)Barbed Wire (27,19)Barbed Wire (29,19)Barbed Wire (31,19)Barbed Wire (33,19)Barbed Wire (35,19)Barbed Wire (37,19)Hedgehog (20,20)Hedgehog (40,20)Barbed Wire (19,21)HESCO Wall (21,21)2HESCO Wall (25,21)2HESCO Wall (29,21)2HESCO Wall (33,21)2HESCO Block (Large) (37,21)2HESCO Block (Large) (38,21)2HESCO Block (Large) (39,21)2HESCO Wall (21,22)2HESCO Block (Large) (22,22)2HESCO Block (Large) (23,22)2HESCO Block (Large) (24,22)2HESCO Block (Large) (25,22)2HESCO Block (Large) (26,22)2Bunker (34,22)2HESCO Wall (39,22)2Barbed Wire (19,23)HESCO Block (Large) (22,23)2Forward Operating Base (23,23)FOB9HESCO Block (Large) (26,23)2HESCO Block (Large) (22,24)2HESCO Block (Large) (26,24)2HESCO Block (Large) (28,24)2Door (29,24)2Door (30,24)2HESCO Block (Large) (31,24)2Barbed Wire (19,25)HESCO Block (Large) (22,25)2HESCO Block (Large) (26,25)2HESCO Block (Large) (28,25)2HESCO Block (Large) (31,25)2HESCO Wall (21,26)2HESCO Block (Large) (22,26)2HESCO Block (Large) (23,26)2Door (24,26)2HESCO Block (Large) (25,26)2HESCO Block (Large) (26,26)2HESCO Block (Large) (39,26)2Barbed Wire (19,27)HESCO Block (Large) (39,27)2Hedgehog (42,27)HESCO Block (Large) (39,28)2Barbed Wire (19,29)Gate (39,29)2HESCO Wall (21,30)2Hedgehog (44,30)Barbed Wire (19,31)Barbed Wire (19,33)HESCO Wall (39,33)2Hedgehog (42,33)HESCO Wall (21,34)2Bunker (22,34)2HESCO Block (Large) (28,34)2HESCO Block (Large) (31,34)2HESCO Block (Large) (34,34)2Talon 9K-SAM (35,34)2HESCO Block (Large) (37,34)2Barbed Wire (19,35)HESCO Block (Large) (28,35)2Door (29,35)2Door (30,35)2HESCO Block (Large) (31,35)2HESCO Block (Large) (34,35)2HESCO Block (Large) (37,35)2HESCO Block (Large) (34,36)2HESCO Block (Large) (35,36)2HESCO Block (Large) (36,36)2HESCO Block (Large) (37,36)2Barbed Wire (19,37)HESCO Block (Large) (39,37)2HESCO Block (Large) (21,38)2HESCO Block (Large) (39,38)2HESCO Wall (21,39)2HESCO Wall (25,39)2HESCO Wall (29,39)2HESCO Wall (33,39)2HESCO Block (Large) (37,39)2HESCO Block (Large) (38,39)2HESCO Block (Large) (39,39)2Hedgehog (20,40)Hedgehog (40,40)Barbed Wire (21,41)Barbed Wire (23,41)Barbed Wire (25,41)Barbed Wire (27,41)Barbed Wire (29,41)Barbed Wire (31,41)Barbed Wire (33,41)Barbed Wire (35,41)Barbed Wire (37,41)HESCO Wall (21,21) z24HESCO Wall (25,21) z24HESCO Wall (29,21) z24HESCO Wall (33,21) z24HESCO Block (Large) (37,21) z24HESCO Block (Large) (38,21) z24HESCO Block (Large) (39,21) z24HESCO Wall (21,22) z24HESCO Wall (21,26) z24HESCO Wall (21,30) z24HESCO Wall (21,34) z24HESCO Block (Large) (21,38) z24Map tower (not buildable)Threat side1 cell = 1.5 mFOB consoleHESCODoor / gateBunker / tower / shelterEmplacementWire / hedgehog
2,748 menu · ≈3,664
Show as table
#Structurex,yzPhase
consoleForward Operating Base23,2301
cbox-n0-n1HESCO Block (Large)22,2201
cbox-n0-n2HESCO Block (Large)23,2201
cbox-n0-n3HESCO Block (Large)24,2201
cbox-n0-n4HESCO Block (Large)25,2201
cbox-n0-n5HESCO Block (Large)26,2201
cbox-e0-e1HESCO Block (Large)26,2301
cbox-e0-e2HESCO Block (Large)26,2401
cbox-e0-e3HESCO Block (Large)26,2501
cbox-s-door-s2Door24,2601
cbox-s0-s1HESCO Block (Large)22,2601
cbox-s0-s2HESCO Block (Large)23,2601
cbox-s1-s1HESCO Block (Large)25,2601
cbox-s1-s2HESCO Block (Large)26,2601
cbox-w0-w1HESCO Block (Large)22,2301
cbox-w0-w2HESCO Block (Large)22,2401
cbox-w0-w3HESCO Block (Large)22,2501
vest-n-b1HESCO Block (Large)28,2502
vest-n-b2HESCO Block (Large)31,2502
vest-n-b3HESCO Block (Large)28,2402
vest-n-b4HESCO Block (Large)31,2402
vest-n-d1Door29,2402
vest-n-d2Door30,2402
vest-s-b1HESCO Block (Large)28,3402
vest-s-b2HESCO Block (Large)31,3402
vest-s-b3HESCO Block (Large)28,3502
vest-s-b4HESCO Block (Large)31,3502
vest-s-d1Door29,3502
vest-s-d2Door30,3502
ring-n0-n1HESCO Wall21,2103
ring-n0-n2HESCO Wall25,2103
ring-n0-n3HESCO Wall29,2103
ring-n0-n4HESCO Wall33,2103
ring-n0-n5HESCO Block (Large)37,2103
ring-n0-n6HESCO Block (Large)38,2103
ring-n0-n7HESCO Block (Large)39,2103
ring-e-gate-e8Gate39,2903
ring-e0-e1HESCO Wall39,2203
ring-e0-e2HESCO Block (Large)39,2603
ring-e0-e3HESCO Block (Large)39,2703
ring-e0-e4HESCO Block (Large)39,2803
ring-e1-e1HESCO Wall39,3303
ring-e1-e2HESCO Block (Large)39,3703
ring-e1-e3HESCO Block (Large)39,3803
ring-s0-s1HESCO Wall21,3903
ring-s0-s2HESCO Wall25,3903
ring-s0-s3HESCO Wall29,3903
ring-s0-s4HESCO Wall33,3903
ring-s0-s5HESCO Block (Large)37,3903
ring-s0-s6HESCO Block (Large)38,3903
ring-s0-s7HESCO Block (Large)39,3903
ring-w0-w1HESCO Wall21,2203
ring-w0-w2HESCO Wall21,2603
ring-w0-w3HESCO Wall21,3003
ring-w0-w4HESCO Wall21,3403
ring-w0-w5HESCO Block (Large)21,3803
bunker-swBunker22,3404
bunker-neBunker34,2204
talonTalon 9K-SAM35,3405
tbox-e0-e1HESCO Block (Large)37,3406
tbox-e0-e2HESCO Block (Large)37,3506
tbox-s0-s1HESCO Block (Large)34,3606
tbox-s0-s2HESCO Block (Large)35,3606
tbox-s0-s3HESCO Block (Large)36,3606
tbox-s0-s4HESCO Block (Large)37,3606
tbox-w0-w1HESCO Block (Large)34,3406
tbox-w0-w2HESCO Block (Large)34,3506
layer2-n0-n1HESCO Wall21,2126
layer2-n0-n2HESCO Wall25,2126
layer2-n0-n3HESCO Wall29,2126
layer2-n0-n4HESCO Wall33,2126
layer2-n0-n5HESCO Block (Large)37,2126
layer2-n0-n6HESCO Block (Large)38,2126
layer2-n0-n7HESCO Block (Large)39,2126
layer2-w0-w1HESCO Wall21,2226
layer2-w0-w2HESCO Wall21,2626
layer2-w0-w3HESCO Wall21,3026
layer2-w0-w4HESCO Wall21,3426
layer2-w0-w5HESCO Block (Large)21,3826
hog-c1Hedgehog20,2007
hog-c2Hedgehog40,2007
hog-c3Hedgehog20,4007
hog-c4Hedgehog40,4007
slalom-1Hedgehog42,2707
slalom-2Hedgehog44,3007
slalom-3Hedgehog42,3307
wire-n1Barbed Wire21,1907
wire-n2Barbed Wire23,1907
wire-n3Barbed Wire25,1907
wire-n4Barbed Wire27,1907
wire-n5Barbed Wire29,1907
wire-n6Barbed Wire31,1907
wire-n7Barbed Wire33,1907
wire-n8Barbed Wire35,1907
wire-n9Barbed Wire37,1907
wire-w10Barbed Wire19,2107
wire-w11Barbed Wire19,2307
wire-w12Barbed Wire19,2507
wire-w13Barbed Wire19,2707
wire-w14Barbed Wire19,2907
wire-w15Barbed Wire19,3107
wire-w16Barbed Wire19,3307
wire-w17Barbed Wire19,3507
wire-w18Barbed Wire19,3707
wire-s19Barbed Wire21,4107
wire-s20Barbed Wire23,4107
wire-s21Barbed Wire25,4107
wire-s22Barbed Wire27,4107
wire-s23Barbed Wire29,4107
wire-s24Barbed Wire31,4107
wire-s25Barbed Wire33,4107
wire-s26Barbed Wire35,4107
wire-s27Barbed Wire37,4107

Cost

Menu
2,748 supplies
≈ To finish
2,943–3,915 ‡
Starting stock
1,250
Pallets
3 (2 extra)
Ural trips
1
Cash per match
$10,970
One-time unlocks
$110,000
Builders
4

‡ contains disputed values

Modules used

Parts list

StructureQtyEachMenu≈ To finishHammer
Phase 01 · 224 → ≈299
HESCO Block (Large)1514 (18)210≈280Medium hammer
Door11414≈19Medium hammer
Forward Operating Base1300≈0Small hammer
Phase 02 · 168 → ≈224
HESCO Block (Large)814 (18)112≈149Medium hammer
Door41456≈75Medium hammer
Phase 03 · 864 → ≈1,152
HESCO Wall1446644≈859Medium hammer
HESCO Block (Large)1214 (18)168≈224Medium hammer
Gate15252≈69Medium hammer
Phase 04 · 122 → ≈163
Bunker261122≈163Large hammer
Phase 05 · 601 → ≈801
Talon 9K-SAM1601 (60 / 80)601≈801Large hammer
Phase 06 · 536 → ≈715
HESCO Wall846368≈491Medium hammer
HESCO Block (Large)1214 (18)168≈224Medium hammer
Phase 07 · 233 → ≈311
Barbed Wire275135≈180Small hammer · $270
Hedgehog71498≈131Small hammer
Total1132,748≈3,664Large hammer

Build phases

Map towers give a code digit and a Hot Zone pull, and their upper floors are the best overwatch on the map. You cannot build inside them, so the lock is a ring at the foot with a two-door vestibule at each entrance and the console box kept at least one cell off the tower wall. Clear every floor before you seal it: whoever is inside when the doors close stays inside.

Phase 01

Console box beside the tower

Deploy the FOB in the north-west corner of the future ring, at least one cell from the tower wall (the dead-zone rule), and box the console with large blocks before anything else.

Phase 02

Vestibules on both entrances

Four large blocks and two doors outside each ground entrance form a two-door lock; the interior cannot be built in, so the lock sits outside the doorway.

Phase 03

Ring with gate

The 19×19 ring around tower and console with the gate on the east face, away from the console box.

Phase 04

Bunkers

Two bunkers on opposite corners with slits on both entrances and the gate.

Phase 05

Talon ground box

The Talon in the south-east with blocks on three sides and the front open; fed from the console by the pair on the top floor.

Phase 06

Second layer

Stack the north and west faces once their base walls are finished.

Phase 07

Outer works

Hedgehogs on the corners, a slalom outside the gate and wire on the three blind faces.

Weaknesses and counters

Enemies already inside the tower
Clear every floor first; the lock only works on an empty tower.
Twelve doors and a gate are fourteen C4 of entrances
Both bunkers look at both entrances; the ring keeps attackers off the vestibules.

Engine notes

  • Whether structures can be placed in a map building doorframe, and the exact dead zone around tower walls.
  • HAMMER_ESCALATION · phase 6
  • HAMMER_ESCALATION · phase 7
  • DISPUTED_VALUE
  • DISPUTED_VALUE
  • DISPUTED_VALUE

In-game proof

No in-game proof yet. Built it? Send a screenshot.

Sources

  • steam-skivin
  • steam-cheekbuster
  • allthings-cluster
  • keengamer-fob
  • wardogs-zone-db
  • fobplans-research
  • yt-liltenhead-raiding
  • Verified on Sep 18, 2026, Patch 0.11 · Methodology

Tower · Flat · Tower lock · Recon outpost · Hot Zone hold · Defensive

Related blueprints

Blueprint, top-down view85 pieces on a 20 × 24 cell grid (1 cell = 1.5 m).Barbed Wire (23,21)Barbed Wire (25,21)Barbed Wire (27,21)Barbed Wire (29,21)Barbed Wire (31,21)Barbed Wire (33,21)Barbed Wire (35,21)Hedgehog (22,22)Hedgehog (38,22)HESCO Wall (23,23)2HESCO Wall (27,23)2HESCO Wall (31,23)2HESCO Block (Large) (35,23)2HESCO Block (Large) (36,23)2HESCO Block (Large) (37,23)2Barbed Wire (39,23)HESCO Wall (23,24)2Recon Tower (24,24)5HESCO Wall (37,24)2Barbed Wire (39,25)Barbed Wire (39,27)HESCO Block (Large) (23,28)2HESCO Block (Large) (24,28)2HESCO Block (Large) (27,28)2HESCO Block (Large) (30,28)2HESCO Block (Large) (31,28)2HESCO Block (Large) (32,28)2HESCO Block (Large) (33,28)2HESCO Block (Large) (34,28)2HESCO Wall (37,28)2HESCO Block (Large) (23,29)2Door (25,29)2HESCO Block (Large) (26,29)2HESCO Block (Large) (30,29)2Forward Operating Base (31,29)FOB9HESCO Block (Large) (34,29)2Barbed Wire (39,29)HESCO Block (Large) (23,30)2HESCO Block (Large) (30,30)2HESCO Block (Large) (34,30)2Door (23,31)2HESCO Block (Large) (30,31)2HESCO Block (Large) (34,31)2Barbed Wire (39,31)HESCO Wall (23,32)2HESCO Block (Large) (30,32)2HESCO Block (Large) (31,32)2Door (32,32)2HESCO Block (Large) (33,32)2HESCO Block (Large) (34,32)2HESCO Wall (37,32)2HESCO Block (Large) (32,33)2HESCO Block (Large) (33,33)2HESCO Block (Large) (34,33)2HESCO Block (Large) (35,33)2Barbed Wire (39,33)HESCO Block (Large) (30,34)2HESCO Block (Large) (31,34)2HESCO Block (Large) (32,34)2HESCO Block (Large) (33,34)2HESCO Block (Large) (34,34)2HESCO Block (Large) (35,34)2Door (30,35)2HESCO Block (Large) (31,35)2HESCO Block (Large) (32,35)2HESCO Block (Large) (33,35)2HESCO Block (Large) (34,35)2HESCO Block (Large) (35,35)2Barbed Wire (39,35)HESCO Block (Large) (23,36)2HESCO Block (Large) (32,36)2HESCO Block (Large) (33,36)2HESCO Block (Large) (34,36)2HESCO Block (Large) (35,36)2HESCO Block (Large) (37,36)2HESCO Wall (23,37)2HESCO Wall (27,37)2HESCO Wall (31,37)2HESCO Block (Large) (35,37)2HESCO Block (Large) (36,37)2HESCO Block (Large) (37,37)2Hedgehog (22,38)Hedgehog (38,38)Vanguard CIWS (32,33) z24Talon 9K-SAM (25,25) z571 cell = 1.5 m
Squad · 4–6 Players · Large hammer

Squad AA Nest: Talon on Tower Deck + CIWS Platform

A Talon on a boxed Recon Tower and a Vanguard CIWS on a 4×4 platform with operator box, inside a 15×15 ring. Two Support 8 players, one Driver hauling Ammo.

2,923 → ≈3,897 · 3 pallets · $10,840

Blueprint, top-down view86 pieces on a 21 × 28 cell grid (1 cell = 1.5 m).Barbed Wire (23,21)Barbed Wire (25,21)Barbed Wire (27,21)Barbed Wire (29,21)Barbed Wire (31,21)Barbed Wire (33,21)Barbed Wire (35,21)Hedgehog (22,22)Hedgehog (38,22)Barbed Wire (21,23)HESCO Wall (23,23)2HESCO Wall (27,23)2HESCO Wall (31,23)2HESCO Block (Large) (35,23)2HESCO Block (Large) (36,23)2HESCO Block (Large) (37,23)2Barbed Wire (39,23)HESCO Wall (23,24)2Bunker (24,24)2Bunker (33,24)2HESCO Wall (37,24)2Barbed Wire (21,25)Barbed Wire (39,25)Barbed Wire (21,27)Barbed Wire (39,27)HESCO Wall (23,28)2HESCO Block (Large) (30,28)2HESCO Block (Large) (31,28)2HESCO Block (Large) (32,28)2HESCO Block (Large) (33,28)2HESCO Block (Large) (34,28)2HESCO Wall (37,28)2Barbed Wire (21,29)HESCO Block (Large) (28,29)2HESCO Block (Large) (29,29)2HESCO Block (Large) (30,29)2Forward Operating Base (31,29)FOB9HESCO Block (Large) (34,29)2Barbed Wire (39,29)Door (28,30)2Door (30,30)2HESCO Block (Large) (34,30)2Barbed Wire (21,31)HESCO Block (Large) (28,31)2HESCO Block (Large) (29,31)2HESCO Block (Large) (30,31)2HESCO Block (Large) (34,31)2Barbed Wire (39,31)HESCO Wall (23,32)2HESCO Block (Large) (30,32)2HESCO Block (Large) (31,32)2HESCO Block (Large) (32,32)2HESCO Block (Large) (33,32)2HESCO Block (Large) (34,32)2HESCO Wall (37,32)2Barbed Wire (21,33)HESCO Wall (24,33)2Gate (25,33)2HESCO Wall (29,33)2HESCO Block (Large) (31,33)2Recon Tower (32,33)5Barbed Wire (39,33)Door (30,34)2Barbed Wire (21,35)HESCO Block (Large) (30,35)2Barbed Wire (39,35)HESCO Block (Large) (23,36)2HESCO Block (Large) (31,36)2HESCO Block (Large) (37,36)2HESCO Block (Large) (23,37)2HESCO Block (Large) (24,37)2Gate (25,37)2HESCO Wall (29,37)2HESCO Wall (33,37)2HESCO Block (Large) (37,37)2Hedgehog (22,38)Hedgehog (38,38)Hedgehog (24,40)Hedgehog (30,40)Hedgehog (27,42)HESCO Wall (23,23) z24HESCO Wall (27,23) z24HESCO Wall (31,23) z24HESCO Block (Large) (35,23) z24HESCO Block (Large) (36,23) z24HESCO Block (Large) (37,23) z241 cell = 1.5 m
Squad · 4–6 Players · Large hammer

Squad Hot Zone Bastion (4–6 Players, Two-High Walls)

A 15×15 ring with vehicle airlock, two bunkers covering the far wall, a tower with kill box, a second wall layer on the threat face, hedgehogs and wire. Built to sit in the Hot Zone and stay there.

1,730 → ≈2,307 · 2 pallets · $10,510

Blueprint, top-down view234 pieces on a 36 × 39 cell grid (1 cell = 1.5 m).Sandbag Wall (43,9)Sandbag Wall (45,9)Recon Tent (44,11)Barbed Wire (17,15)Barbed Wire (19,15)Barbed Wire (21,15)Barbed Wire (23,15)Barbed Wire (25,15)Barbed Wire (27,15)Barbed Wire (29,15)Barbed Wire (31,15)Barbed Wire (33,15)Barbed Wire (35,15)Barbed Wire (37,15)Barbed Wire (39,15)Barbed Wire (41,15)Barbed Wire (44,15)Barbed Wire (15,17)Bremer Wall (17,17)3Bremer Wall (18,17)3Bremer Wall (19,17)3Bremer Wall (20,17)3Bremer Wall (21,17)3Bremer Wall (22,17)3Bremer Wall (23,17)3Bremer Wall (24,17)3Bremer Wall (25,17)3Bremer Wall (26,17)3Bremer Wall (27,17)3Bremer Wall (28,17)3Bremer Wall (29,17)3Bremer Wall (30,17)3Bremer Wall (31,17)3Bremer Wall (32,17)3Bremer Wall (33,17)3Bremer Wall (34,17)3Bremer Wall (35,17)3Bremer Wall (36,17)3Bremer Wall (37,17)3Bremer Wall (38,17)3Bremer Wall (39,17)3Bremer Wall (40,17)3Bremer Wall (41,17)3Bremer Wall (42,17)3Bremer Wall (43,17)3Bremer Wall (17,18)3Bremer Wall (43,18)3Barbed Wire (15,19)Bremer Wall (17,19)3Bremer Wall (43,19)3Bremer Wall (17,20)3Bremer Wall (43,20)3Barbed Wire (15,21)Bremer Wall (17,21)3Bremer Wall (43,21)3Bremer Wall (17,22)3HESCO Wall (22,22)2HESCO Wall (26,22)2HESCO Wall (30,22)2HESCO Wall (34,22)2HESCO Block (Large) (38,22)2Bremer Wall (43,22)3Barbed Wire (15,23)Bremer Wall (17,23)3HESCO Wall (22,23)2Bunker (23,23)2Bunker (34,23)2HESCO Wall (38,23)2Bremer Wall (43,23)3Bremer Wall (17,24)3Bremer Wall (43,24)3Barbed Wire (15,25)Bremer Wall (17,25)3Bremer Wall (43,25)3Bremer Wall (17,26)3Bremer Wall (43,26)3Barbed Wire (15,27)Bremer Wall (17,27)3HESCO Wall (22,27)2HESCO Block (Small) (23,27)HESCO Block (Small) (24,27)HESCO Block (Small) (25,27)HESCO Block (Small) (26,27)HESCO Block (Small) (27,27)HESCO Block (Large) (29,27)2Door (30,27)2HESCO Block (Large) (31,27)2HESCO Wall (38,27)2Bremer Wall (43,27)3Bremer Wall (17,28)3HESCO Block (Small) (23,28)L81 Mortar (24,28)HESCO Block (Small) (27,28)HESCO Block (Large) (29,28)2HESCO Block (Large) (31,28)2Bremer Wall (43,28)3Barbed Wire (15,29)Bremer Wall (17,29)3HESCO Block (Small) (23,29)HESCO Block (Large) (28,29)2HESCO Block (Large) (29,29)2Door (30,29)2HESCO Block (Large) (31,29)2HESCO Block (Large) (32,29)2Gate (43,29)2Hedgehog (46,29)Bremer Wall (17,30)3HESCO Block (Small) (23,30)HESCO Block (Large) (28,30)2Forward Operating Base (29,30)FOB9HESCO Block (Large) (32,30)2Barbed Wire (15,31)Bremer Wall (17,31)3HESCO Wall (22,31)2HESCO Block (Small) (23,31)HESCO Block (Small) (24,31)HESCO Block (Small) (25,31)HESCO Block (Small) (26,31)HESCO Block (Small) (27,31)HESCO Block (Large) (28,31)2HESCO Block (Large) (32,31)2HESCO Wall (38,31)2Bremer Wall (17,32)3HESCO Block (Large) (28,32)2HESCO Block (Large) (32,32)2Door (35,32)2HESCO Block (Large) (36,32)2Hedgehog (48,32)Barbed Wire (15,33)Bremer Wall (17,33)3HESCO Block (Large) (23,33)2HESCO Block (Large) (24,33)2HESCO Block (Large) (25,33)2HESCO Block (Large) (26,33)2HESCO Block (Large) (27,33)2HESCO Block (Large) (28,33)2HESCO Block (Large) (29,33)2HESCO Block (Large) (30,33)2HESCO Block (Large) (31,33)2HESCO Block (Large) (32,33)2HESCO Block (Large) (34,33)2HESCO Block (Large) (37,33)2Bremer Wall (43,33)3Bremer Wall (17,34)3HESCO Block (Large) (23,34)2Stingray (24,34)HESCO Block (Large) (27,34)2Recon Tower (34,34)5Bremer Wall (43,34)3Barbed Wire (15,35)Bremer Wall (17,35)3HESCO Block (Large) (22,35)2HESCO Block (Large) (23,35)2Door (27,35)2HESCO Block (Large) (38,35)2Bremer Wall (43,35)3Hedgehog (46,35)Bremer Wall (17,36)3HESCO Block (Large) (22,36)2HESCO Block (Large) (23,36)2HESCO Block (Large) (27,36)2HESCO Block (Large) (38,36)2Bremer Wall (43,36)3Barbed Wire (15,37)Bremer Wall (17,37)3HESCO Block (Large) (22,37)2HESCO Block (Large) (23,37)2HESCO Block (Large) (24,37)2HESCO Block (Large) (25,37)2HESCO Block (Large) (26,37)2HESCO Block (Large) (27,37)2HESCO Block (Large) (38,37)2Bremer Wall (43,37)3Bremer Wall (17,38)3HESCO Wall (22,38)2HESCO Block (Large) (26,38)2HESCO Block (Large) (27,38)2HESCO Block (Large) (28,38)2Gate (29,38)2HESCO Wall (33,38)2HESCO Block (Large) (37,38)2HESCO Block (Large) (38,38)2Bremer Wall (43,38)3Barbed Wire (15,39)Bremer Wall (17,39)3Bremer Wall (43,39)3Bremer Wall (17,40)3Bremer Wall (43,40)3Barbed Wire (15,41)Bremer Wall (17,41)3Bremer Wall (43,41)3Bremer Wall (17,42)3Bremer Wall (43,42)3Bremer Wall (17,43)3Bremer Wall (18,43)3Bremer Wall (19,43)3Bremer Wall (20,43)3Bremer Wall (21,43)3Bremer Wall (22,43)3Bremer Wall (23,43)3Bremer Wall (24,43)3Bremer Wall (25,43)3Bremer Wall (26,43)3Bremer Wall (27,43)3Bremer Wall (28,43)3Bremer Wall (29,43)3Bremer Wall (30,43)3Bremer Wall (31,43)3Bremer Wall (32,43)3Bremer Wall (33,43)3Bremer Wall (34,43)3Bremer Wall (35,43)3Bremer Wall (36,43)3Bremer Wall (37,43)3Bremer Wall (38,43)3Bremer Wall (39,43)3Bremer Wall (40,43)3Bremer Wall (41,43)3Bremer Wall (42,43)3Bremer Wall (43,43)3Barbed Wire (17,45)Barbed Wire (19,45)Barbed Wire (21,45)Barbed Wire (23,45)Barbed Wire (25,45)Barbed Wire (27,45)Barbed Wire (29,45)Barbed Wire (31,45)Barbed Wire (33,45)Barbed Wire (35,45)Barbed Wire (37,45)Barbed Wire (39,45)Barbed Wire (41,45)Talon 9K-SAM (35,35) z571 cell = 1.5 m
Team · 10–15 Players · Large hammer

Team Layered Citadel: Bremer Shell, HESCO Core, Every Emplacement

A 27×27 Bremer shell around a 17×17 HESCO ring with a four-cell vehicle lane between them, gates offset by 90°, bunkers, Talon tower, mortar pit and Stingray nest. The all-in base for a full team with ten hammers.

3,771 → ≈5,028 · 3 pallets · $11,500

Blueprint, top-down view62 pieces on a 18 × 23 cell grid (1 cell = 1.5 m).Barbed Wire (24,22)Barbed Wire (26,22)Barbed Wire (28,22)Barbed Wire (30,22)Barbed Wire (32,22)Barbed Wire (34,22)Hedgehog (23,23)Hedgehog (37,23)HESCO Wall (24,24)2HESCO Wall (28,24)2HESCO Wall (32,24)2HESCO Block (Large) (36,24)2Barbed Wire (38,24)HESCO Wall (24,25)2HESCO Block (Large) (30,25)2HESCO Block (Large) (31,25)2HESCO Block (Large) (32,25)2HESCO Block (Large) (33,25)2HESCO Block (Large) (34,25)2HESCO Wall (36,25)2HESCO Block (Large) (30,26)2Forward Operating Base (31,26)FOB9HESCO Block (Large) (34,26)2Barbed Wire (38,26)HESCO Block (Large) (30,27)2Door (34,27)2HESCO Block (Large) (30,28)2HESCO Block (Large) (34,28)2Barbed Wire (38,28)HESCO Block (Large) (24,29)2HESCO Block (Large) (27,29)2HESCO Block (Large) (30,29)2HESCO Block (Large) (31,29)2HESCO Block (Large) (32,29)2HESCO Block (Large) (33,29)2HESCO Block (Large) (34,29)2HESCO Wall (36,29)2HESCO Block (Large) (24,30)2Indirect Fire Shelter (25,30)3Barbed Wire (38,30)Gate (24,31)2Bunker (31,31)2HESCO Block (Large) (30,32)2Barbed Wire (38,32)HESCO Block (Large) (36,33)2HESCO Block (Large) (36,34)2Barbed Wire (38,34)HESCO Block (Large) (24,35)2Door (27,35)2HESCO Block (Large) (36,35)2HESCO Wall (24,36)2HESCO Wall (28,36)2HESCO Wall (32,36)2HESCO Block (Large) (36,36)2Hedgehog (23,37)Hedgehog (37,37)Barbed Wire (24,38)Barbed Wire (26,38)Barbed Wire (28,38)Barbed Wire (30,38)Barbed Wire (32,38)Barbed Wire (34,38)1 cell = 1.5 m
Squad · 3–6 Players · Large hammer

Squad Spawn Shield: IFS Garage over the Spawn Ural

An Indirect Fire Shelter garages the spawn vehicle right behind the gate of a 13×13 ring, a bunker covers the gate from inside, hedgehogs and wire outside. Teammates spawn on the roof, shells never reach the truck.

1,112 → ≈1,483 · 1 pallets · $10,480