Skip to content
FOBplans

Base · Squad · 2,307 supplies · Large hammer

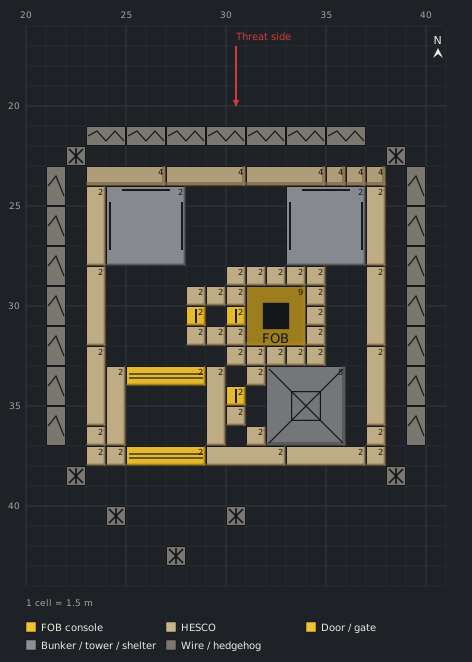
Squad Hot Zone Bastion (4–6 Players, Two-High Walls)

A 15×15 ring with vehicle airlock, two bunkers covering the far wall, a tower with kill box, a second wall layer on the threat face, hedgehogs and wire. Built to sit in the Hot Zone and stay there.

Data only· Patch 0.11· Sep 18, 2026Updated Sep 18, 2026
  • 4–6 Players
  • Large hammer
  • Support level 8
  • FOB required
  • 55 min
  • Support 8 · placer
  • Driver 3 · logistics
  • 3× Any · finishers
Build modeDownload PNG
Generated preview1 cell = 1.5 m
Blueprint, top-down view86 pieces on a 21 × 28 cell grid (1 cell = 1.5 m).20253035402025303540Barbed Wire (23,21)Barbed Wire (25,21)Barbed Wire (27,21)Barbed Wire (29,21)Barbed Wire (31,21)Barbed Wire (33,21)Barbed Wire (35,21)Hedgehog (22,22)Hedgehog (38,22)Barbed Wire (21,23)HESCO Wall (23,23)2HESCO Wall (27,23)2HESCO Wall (31,23)2HESCO Block (Large) (35,23)2HESCO Block (Large) (36,23)2HESCO Block (Large) (37,23)2Barbed Wire (39,23)HESCO Wall (23,24)2Bunker (24,24)2Bunker (33,24)2HESCO Wall (37,24)2Barbed Wire (21,25)Barbed Wire (39,25)Barbed Wire (21,27)Barbed Wire (39,27)HESCO Wall (23,28)2HESCO Block (Large) (30,28)2HESCO Block (Large) (31,28)2HESCO Block (Large) (32,28)2HESCO Block (Large) (33,28)2HESCO Block (Large) (34,28)2HESCO Wall (37,28)2Barbed Wire (21,29)HESCO Block (Large) (28,29)2HESCO Block (Large) (29,29)2HESCO Block (Large) (30,29)2Forward Operating Base (31,29)FOB9HESCO Block (Large) (34,29)2Barbed Wire (39,29)Door (28,30)2Door (30,30)2HESCO Block (Large) (34,30)2Barbed Wire (21,31)HESCO Block (Large) (28,31)2HESCO Block (Large) (29,31)2HESCO Block (Large) (30,31)2HESCO Block (Large) (34,31)2Barbed Wire (39,31)HESCO Wall (23,32)2HESCO Block (Large) (30,32)2HESCO Block (Large) (31,32)2HESCO Block (Large) (32,32)2HESCO Block (Large) (33,32)2HESCO Block (Large) (34,32)2HESCO Wall (37,32)2Barbed Wire (21,33)HESCO Wall (24,33)2Gate (25,33)2HESCO Wall (29,33)2HESCO Block (Large) (31,33)2Recon Tower (32,33)5Barbed Wire (39,33)Door (30,34)2Barbed Wire (21,35)HESCO Block (Large) (30,35)2Barbed Wire (39,35)HESCO Block (Large) (23,36)2HESCO Block (Large) (31,36)2HESCO Block (Large) (37,36)2HESCO Block (Large) (23,37)2HESCO Block (Large) (24,37)2Gate (25,37)2HESCO Wall (29,37)2HESCO Wall (33,37)2HESCO Block (Large) (37,37)2Hedgehog (22,38)Hedgehog (38,38)Hedgehog (24,40)Hedgehog (30,40)Hedgehog (27,42)HESCO Wall (23,23) z24HESCO Wall (27,23) z24HESCO Wall (31,23) z24HESCO Block (Large) (35,23) z24HESCO Block (Large) (36,23) z24HESCO Block (Large) (37,23) z24Threat side1 cell = 1.5 mFOB consoleHESCODoor / gateBunker / tower / shelterWire / hedgehog
1,730 menu · ≈2,307
Show as table
#Structurex,yzPhase
consoleForward Operating Base31,2901
cbox-n0-n1HESCO Block (Large)30,2801
cbox-n0-n2HESCO Block (Large)31,2801
cbox-n0-n3HESCO Block (Large)32,2801
cbox-n0-n4HESCO Block (Large)33,2801
cbox-n0-n5HESCO Block (Large)34,2801
cbox-e0-e1HESCO Block (Large)34,2901
cbox-e0-e2HESCO Block (Large)34,3001
cbox-e0-e3HESCO Block (Large)34,3101
cbox-s0-s1HESCO Block (Large)30,3201
cbox-s0-s2HESCO Block (Large)31,3201
cbox-s0-s3HESCO Block (Large)32,3201
cbox-s0-s4HESCO Block (Large)33,3201
cbox-s0-s5HESCO Block (Large)34,3201
cbox-w-door-w2Door30,3001
cbox-w0-w1HESCO Block (Large)30,2901
cbox-w1-w1HESCO Block (Large)30,3101
cbox-al-b1HESCO Block (Large)29,3101
cbox-al-b2HESCO Block (Large)29,2901
cbox-al-b3HESCO Block (Large)28,3101
cbox-al-b4HESCO Block (Large)28,2901
cbox-al-door2Door28,3001
ring-n0-n1HESCO Wall23,2302
ring-n0-n2HESCO Wall27,2302
ring-n0-n3HESCO Wall31,2302
ring-n0-n4HESCO Block (Large)35,2302
ring-n0-n5HESCO Block (Large)36,2302
ring-n0-n6HESCO Block (Large)37,2302
ring-e0-e1HESCO Wall37,2402
ring-e0-e2HESCO Wall37,2802
ring-e0-e3HESCO Wall37,3202
ring-e0-e4HESCO Block (Large)37,3602
ring-s-gate-s2Gate25,3702
ring-s0-s1HESCO Block (Large)23,3702
ring-s0-s2HESCO Block (Large)24,3702
ring-s1-s1HESCO Wall29,3702
ring-s1-s2HESCO Wall33,3702
ring-s1-s3HESCO Block (Large)37,3702
ring-w0-w1HESCO Wall23,2402
ring-w0-w2HESCO Wall23,2802
ring-w0-w3HESCO Wall23,3202
ring-w0-w4HESCO Block (Large)23,3602
va-a-w1HESCO Wall24,3303
va-b-e1HESCO Wall29,3303
va-inner-gateGate25,3303
bunker-nwBunker24,2404
bunker-neBunker33,2404
towerRecon Tower32,3304
tower-lb1HESCO Block (Large)31,3305
tower-lb2HESCO Block (Large)31,3605
tower-lb3HESCO Block (Large)30,3505
tower-ld1Door30,3405
layer2-n0-n1HESCO Wall23,2325
layer2-n0-n2HESCO Wall27,2325
layer2-n0-n3HESCO Wall31,2325
layer2-n0-n4HESCO Block (Large)35,2325
layer2-n0-n5HESCO Block (Large)36,2325
layer2-n0-n6HESCO Block (Large)37,2325
hog-c1Hedgehog22,2206
hog-c2Hedgehog38,2206
hog-c3Hedgehog22,3806
hog-c4Hedgehog38,3806
slalom-1Hedgehog24,4006
slalom-2Hedgehog27,4206
slalom-3Hedgehog30,4006
wire-n1Barbed Wire23,2106
wire-n2Barbed Wire25,2106
wire-n3Barbed Wire27,2106
wire-n4Barbed Wire29,2106
wire-n5Barbed Wire31,2106
wire-n6Barbed Wire33,2106
wire-n7Barbed Wire35,2106
wire-e8Barbed Wire39,2306
wire-e9Barbed Wire39,2506
wire-e10Barbed Wire39,2706
wire-e11Barbed Wire39,2906
wire-e12Barbed Wire39,3106
wire-e13Barbed Wire39,3306
wire-e14Barbed Wire39,3506
wire-w15Barbed Wire21,2306
wire-w16Barbed Wire21,2506
wire-w17Barbed Wire21,2706
wire-w18Barbed Wire21,2906
wire-w19Barbed Wire21,3106
wire-w20Barbed Wire21,3306
wire-w21Barbed Wire21,3506

Cost

Menu
1,730 supplies
≈ To finish
2,307–2,619 ‡
Starting stock
1,250
Pallets
2 (1 extra)
Ural trips
1
Cash per match
$10,510
One-time unlocks
$110,000
Builders
4

‡ contains disputed values

Modules used

Parts list

StructureQtyEachMenu≈ To finishHammer
Phase 01 · 294 → ≈392
HESCO Block (Large)1914 (18)266≈355Medium hammer
Door21428≈37Medium hammer
Forward Operating Base1300≈0Small hammer
Phase 02 · 670 → ≈893
HESCO Wall1146506≈675Medium hammer
HESCO Block (Large)814 (18)112≈149Medium hammer
Gate15252≈69Medium hammer
Phase 03 · 144 → ≈192
HESCO Wall24692≈123Medium hammer
Gate15252≈69Medium hammer
Phase 04 · 183 → ≈244
Bunker261122≈163Large hammer
Recon Tower161 (163)61≈81Large hammer
Phase 05 · 236 → ≈315
HESCO Wall346138≈184Medium hammer
HESCO Block (Large)614 (18)84≈112Medium hammer
Door11414≈19Medium hammer
Phase 06 · 203 → ≈271
Barbed Wire215105≈140Small hammer · $210
Hedgehog71498≈131Small hammer
Total861,730≈2,307Large hammer

Build phases

Players inside the Hot Zone count double, which makes this base a magnet. One or two Support 8 players place the heavy pieces, everyone else finishes walls, and the Driver keeps two pallets ahead of the build. Stack the second layer only after every base wall reads 100%.

Phase 01

Console box with airlock

Deploy the FOB, take the Medium hammer from the console and box the console with large blocks and a two-door airlock before anything else. The 30-second console hack is the fastest way to lose the whole base.

Phase 02

Ring with gate

The 15×15 ring, gate on the south-west of the south face, away from the Hot Zone centre and never in line with the console box door.

Phase 03

Vehicle airlock

Corridor walls and the inner gate four cells in.

Phase 04

Bunkers and tower

Two bunkers at the north corners with slits covering the far wall, the tower in the south-east with its ladder facing west into the base.

Phase 05

Ladder box and second layer

Box the ladder once the tower reads 100%, then stack the north face once its base walls are finished: four block heights defeat vehicle-roof jumps.

Phase 06

Outer works

Hedgehogs on every corner, a slalom in front of the gate and wire on the three exposed faces.

Weaknesses and counters

No shelter from mortars
An Indirect Fire Shelter over the spawn vehicle is the first extension.
The Hot Zone double-count makes it a target for everyone
Bunker crossfire on the north face and two players on permanent repair duty.
Gate at two C4
The inner gate and the tower beside the lane keep a breach out of the core.

Engine notes

  • Confirm that stacking counts as attaching (base fully built first) and the Bremer hammer tier.
  • HAMMER_ESCALATION · phase 5
  • HAMMER_ESCALATION · phase 6
  • DISPUTED_VALUE
  • DISPUTED_VALUE
  • DISPUTED_VALUE

In-game proof

No in-game proof yet. Built it? Send a screenshot.

Sources

  • steam-skivin
  • steam-cheekbuster
  • allthings-cluster
  • keengamer-fob
  • wardogs-zone-db
  • fobplans-research
  • Verified on Sep 18, 2026, Patch 0.11 · Methodology

Stadium · Flat · Hot Zone hold · Defensive

Related blueprints

Blueprint, top-down view58 pieces on a 17 × 26 cell grid (1 cell = 1.5 m).Barbed Wire (24,22)Barbed Wire (26,22)Barbed Wire (28,22)Barbed Wire (30,22)Barbed Wire (32,22)Barbed Wire (34,22)Barbed Wire (22,24)HESCO Wall (24,24)2HESCO Wall (28,24)2HESCO Wall (32,24)2HESCO Block (Large) (36,24)2HESCO Wall (24,25)2HESCO Block (Large) (28,25)2HESCO Block (Large) (29,25)2HESCO Block (Large) (30,25)2HESCO Block (Large) (31,25)2HESCO Block (Large) (32,25)2HESCO Wall (36,25)2Barbed Wire (22,26)HESCO Block (Large) (28,26)2Forward Operating Base (29,26)FOB9HESCO Block (Large) (32,26)2Door (28,27)2HESCO Block (Large) (32,27)2Barbed Wire (22,28)HESCO Block (Large) (28,28)2HESCO Block (Large) (32,28)2HESCO Wall (24,29)2HESCO Block (Large) (28,29)2HESCO Block (Large) (29,29)2HESCO Block (Large) (30,29)2HESCO Block (Large) (31,29)2HESCO Block (Large) (32,29)2HESCO Block (Large) (36,29)2Barbed Wire (22,30)HESCO Block (Large) (36,30)2HESCO Wall (27,31)2Gate (28,31)2HESCO Wall (32,31)2HESCO Block (Large) (36,31)2Barbed Wire (22,32)Door (36,32)2HESCO Block (Large) (24,33)2HESCO Block (Large) (36,33)2Barbed Wire (22,34)HESCO Block (Large) (24,34)2HESCO Block (Large) (36,34)2HESCO Block (Large) (24,35)2HESCO Block (Large) (27,35)2HESCO Block (Large) (32,35)2HESCO Block (Large) (36,35)2HESCO Wall (24,36)2Gate (28,36)2HESCO Wall (32,36)2HESCO Block (Large) (36,36)2Hedgehog (25,39)Hedgehog (31,39)Hedgehog (28,41)1 cell = 1.5 m
Duo · 2–3 Players · Medium hammer

Duo FOB Core with Vehicle Gate Airlock

Two players, one truck: a boxed console inside a 13×13 ring with a two-gate vehicle airlock, slalom and wire. The base every logistics run starts from.

1,086 → ≈1,448 · 1 pallets · $8,020

Blueprint, top-down view55 pieces on a 17 × 21 cell grid (1 cell = 1.5 m).Barbed Wire (24,22)Barbed Wire (26,22)Barbed Wire (28,22)Barbed Wire (30,22)Barbed Wire (32,22)Barbed Wire (34,22)HESCO Wall (24,24)2HESCO Wall (28,24)2HESCO Wall (32,24)2HESCO Block (Large) (36,24)2Barbed Wire (38,24)HESCO Wall (24,25)2Recon Tower (25,25)5HESCO Block (Large) (29,25)2HESCO Wall (36,25)2Door (30,26)2Barbed Wire (38,26)HESCO Block (Large) (30,27)2HESCO Block (Large) (29,28)2Barbed Wire (38,28)HESCO Block (Large) (24,29)2HESCO Wall (36,29)2HESCO Block (Large) (24,30)2HESCO Block (Large) (28,30)2HESCO Block (Large) (29,30)2HESCO Block (Large) (30,30)2HESCO Block (Large) (31,30)2HESCO Block (Large) (32,30)2Barbed Wire (38,30)HESCO Block (Large) (24,31)2HESCO Block (Large) (28,31)2Forward Operating Base (29,31)FOB9HESCO Block (Large) (32,31)2Door (24,32)2HESCO Block (Large) (28,32)2HESCO Block (Large) (32,32)2Barbed Wire (38,32)HESCO Block (Large) (24,33)2HESCO Block (Large) (28,33)2HESCO Block (Large) (32,33)2HESCO Block (Large) (36,33)2HESCO Block (Large) (24,34)2HESCO Block (Large) (28,34)2HESCO Block (Large) (29,34)2Door (30,34)2HESCO Block (Large) (31,34)2HESCO Block (Large) (32,34)2HESCO Block (Large) (36,34)2Barbed Wire (38,34)HESCO Block (Large) (24,35)2HESCO Block (Large) (36,35)2HESCO Wall (24,36)2HESCO Wall (28,36)2HESCO Wall (32,36)2HESCO Block (Large) (36,36)21 cell = 1.5 m
Duo · 2–3 Players · Large hammer

Duo Overwatch Tower with Ladder Kill Box

A Recon Tower in the corner of a 13×13 ring, its ladder boxed with blocks and a door, wire on the blind faces. Two Support players, one with the Large hammer.

983 → ≈1,311 · 1 pallets · $10,420

Blueprint, top-down view155 pieces on a 25 × 32 cell grid (1 cell = 1.5 m).Barbed Wire (21,19)Barbed Wire (23,19)Barbed Wire (25,19)Barbed Wire (27,19)Barbed Wire (29,19)Barbed Wire (31,19)Barbed Wire (33,19)Barbed Wire (35,19)Barbed Wire (37,19)Hedgehog (20,20)Hedgehog (40,20)Barbed Wire (19,21)HESCO Wall (21,21)2HESCO Wall (25,21)2HESCO Wall (29,21)2HESCO Wall (33,21)2HESCO Block (Large) (37,21)2HESCO Block (Large) (38,21)2HESCO Block (Large) (39,21)2Barbed Wire (41,21)HESCO Wall (21,22)2Bunker (22,22)2HESCO Block (Large) (28,22)2HESCO Block (Large) (29,22)2HESCO Block (Large) (30,22)2HESCO Block (Large) (31,22)2HESCO Block (Large) (32,22)2Bunker (35,22)2HESCO Wall (39,22)2Barbed Wire (19,23)HESCO Block (Large) (28,23)2Drill Rig (29,23)15HESCO Block (Large) (32,23)2Barbed Wire (41,23)HESCO Block (Large) (28,24)2HESCO Block (Large) (32,24)2Barbed Wire (19,25)HESCO Block (Large) (28,25)2HESCO Block (Large) (32,25)2Barbed Wire (41,25)HESCO Wall (21,26)2HESCO Block (Large) (28,26)2HESCO Block (Large) (32,26)2HESCO Wall (39,26)2Barbed Wire (19,27)Door (28,27)2HESCO Block (Large) (29,27)2HESCO Block (Large) (30,27)2HESCO Block (Large) (31,27)2HESCO Block (Large) (32,27)2HESCO Block (Large) (34,27)2HESCO Block (Large) (35,27)2HESCO Block (Large) (36,27)2HESCO Block (Large) (37,27)2HESCO Block (Large) (38,27)2Barbed Wire (41,27)HESCO Block (Large) (28,28)2HESCO Block (Large) (29,28)2HESCO Block (Large) (30,28)2HESCO Block (Large) (31,28)2HESCO Block (Large) (32,28)2Door (34,28)2Drill Rig (35,28)15HESCO Block (Large) (38,28)2Barbed Wire (19,29)HESCO Block (Large) (26,29)2HESCO Block (Large) (27,29)2HESCO Block (Large) (28,29)2Forward Operating Base (29,29)FOB9HESCO Block (Large) (32,29)2HESCO Block (Large) (34,29)2HESCO Block (Large) (38,29)2Barbed Wire (41,29)HESCO Wall (21,30)2Door (26,30)2Door (28,30)2HESCO Block (Large) (32,30)2HESCO Block (Large) (34,30)2HESCO Block (Large) (38,30)2HESCO Wall (39,30)2Barbed Wire (19,31)HESCO Block (Large) (26,31)2HESCO Block (Large) (27,31)2HESCO Block (Large) (28,31)2HESCO Block (Large) (32,31)2HESCO Block (Large) (34,31)2HESCO Block (Large) (38,31)2Barbed Wire (41,31)HESCO Block (Large) (28,32)2HESCO Block (Large) (29,32)2HESCO Block (Large) (30,32)2HESCO Block (Large) (31,32)2HESCO Block (Large) (32,32)2HESCO Block (Large) (34,32)2HESCO Block (Large) (35,32)2HESCO Block (Large) (36,32)2HESCO Block (Large) (37,32)2HESCO Block (Large) (38,32)2Barbed Wire (19,33)Door (28,33)2HESCO Block (Large) (29,33)2HESCO Block (Large) (30,33)2HESCO Block (Large) (31,33)2HESCO Block (Large) (32,33)2Door (36,33)2HESCO Block (Large) (37,33)2Barbed Wire (41,33)HESCO Wall (21,34)2HESCO Block (Large) (28,34)2Drill Rig (29,34)15HESCO Block (Large) (32,34)2HESCO Block (Large) (35,34)2HESCO Block (Large) (38,34)2HESCO Wall (39,34)2Barbed Wire (19,35)HESCO Wall (22,35)2Gate (23,35)2HESCO Wall (27,35)2HESCO Block (Large) (28,35)2HESCO Block (Large) (32,35)2Recon Tower (35,35)5Barbed Wire (41,35)HESCO Block (Large) (28,36)2HESCO Block (Large) (32,36)2Barbed Wire (19,37)HESCO Block (Large) (28,37)2HESCO Block (Large) (32,37)2Barbed Wire (41,37)HESCO Block (Large) (21,38)2HESCO Block (Large) (28,38)2HESCO Block (Large) (29,38)2HESCO Block (Large) (30,38)2HESCO Block (Large) (31,38)2HESCO Block (Large) (32,38)2HESCO Block (Large) (39,38)2HESCO Block (Large) (21,39)2HESCO Block (Large) (22,39)2Gate (23,39)2HESCO Wall (27,39)2HESCO Wall (31,39)2HESCO Wall (35,39)2HESCO Block (Large) (39,39)2Hedgehog (20,40)Hedgehog (40,40)Hedgehog (22,42)Hedgehog (28,42)Hedgehog (25,44)HESCO Wall (21,21) z24HESCO Wall (25,21) z24HESCO Wall (29,21) z24HESCO Wall (33,21) z24HESCO Block (Large) (37,21) z24HESCO Block (Large) (38,21) z24HESCO Block (Large) (39,21) z24Talon 9K-SAM (36,36) z571 cell = 1.5 m
Platoon · 8–12 Players · Large hammer

Team Drill Rig Fortress: Three Staggered Rigs for Permanent Control

A 19×19 ring with airlock, bunkers, a Talon tower, a second wall layer and three boxed drill rigs at separate edges. Fuel logistics keep the Hot Zone parked on your base.

7,400 → ≈9,867 · 6 pallets · $12,170

Blueprint, top-down view113 pieces on a 28 × 29 cell grid (1 cell = 1.5 m).Barbed Wire (21,19)Barbed Wire (23,19)Barbed Wire (25,19)Barbed Wire (27,19)Barbed Wire (29,19)Barbed Wire (31,19)Barbed Wire (33,19)Barbed Wire (35,19)Barbed Wire (37,19)Hedgehog (20,20)Hedgehog (40,20)Barbed Wire (19,21)HESCO Wall (21,21)2HESCO Wall (25,21)2HESCO Wall (29,21)2HESCO Wall (33,21)2HESCO Block (Large) (37,21)2HESCO Block (Large) (38,21)2HESCO Block (Large) (39,21)2HESCO Wall (21,22)2HESCO Block (Large) (22,22)2HESCO Block (Large) (23,22)2HESCO Block (Large) (24,22)2HESCO Block (Large) (25,22)2HESCO Block (Large) (26,22)2Bunker (34,22)2HESCO Wall (39,22)2Barbed Wire (19,23)HESCO Block (Large) (22,23)2Forward Operating Base (23,23)FOB9HESCO Block (Large) (26,23)2HESCO Block (Large) (22,24)2HESCO Block (Large) (26,24)2HESCO Block (Large) (28,24)2Door (29,24)2Door (30,24)2HESCO Block (Large) (31,24)2Barbed Wire (19,25)HESCO Block (Large) (22,25)2HESCO Block (Large) (26,25)2HESCO Block (Large) (28,25)2HESCO Block (Large) (31,25)2HESCO Wall (21,26)2HESCO Block (Large) (22,26)2HESCO Block (Large) (23,26)2Door (24,26)2HESCO Block (Large) (25,26)2HESCO Block (Large) (26,26)2HESCO Block (Large) (39,26)2Barbed Wire (19,27)HESCO Block (Large) (39,27)2Hedgehog (42,27)HESCO Block (Large) (39,28)2Barbed Wire (19,29)Gate (39,29)2HESCO Wall (21,30)2Hedgehog (44,30)Barbed Wire (19,31)Barbed Wire (19,33)HESCO Wall (39,33)2Hedgehog (42,33)HESCO Wall (21,34)2Bunker (22,34)2HESCO Block (Large) (28,34)2HESCO Block (Large) (31,34)2HESCO Block (Large) (34,34)2Talon 9K-SAM (35,34)2HESCO Block (Large) (37,34)2Barbed Wire (19,35)HESCO Block (Large) (28,35)2Door (29,35)2Door (30,35)2HESCO Block (Large) (31,35)2HESCO Block (Large) (34,35)2HESCO Block (Large) (37,35)2HESCO Block (Large) (34,36)2HESCO Block (Large) (35,36)2HESCO Block (Large) (36,36)2HESCO Block (Large) (37,36)2Barbed Wire (19,37)HESCO Block (Large) (39,37)2HESCO Block (Large) (21,38)2HESCO Block (Large) (39,38)2HESCO Wall (21,39)2HESCO Wall (25,39)2HESCO Wall (29,39)2HESCO Wall (33,39)2HESCO Block (Large) (37,39)2HESCO Block (Large) (38,39)2HESCO Block (Large) (39,39)2Hedgehog (20,40)Hedgehog (40,40)Barbed Wire (21,41)Barbed Wire (23,41)Barbed Wire (25,41)Barbed Wire (27,41)Barbed Wire (29,41)Barbed Wire (31,41)Barbed Wire (33,41)Barbed Wire (35,41)Barbed Wire (37,41)HESCO Wall (21,21) z24HESCO Wall (25,21) z24HESCO Wall (29,21) z24HESCO Wall (33,21) z24HESCO Block (Large) (37,21) z24HESCO Block (Large) (38,21) z24HESCO Block (Large) (39,21) z24HESCO Wall (21,22) z24HESCO Wall (21,26) z24HESCO Wall (21,30) z24HESCO Wall (21,34) z24HESCO Block (Large) (21,38) z241 cell = 1.5 m
Platoon · 7–10 Players · Large hammer

Team Tower Lock: Sealing a Map Tower as Team Overwatch

A 19×19 ring around a map tower: two-door vestibules on both ground entrances, corner bunkers, a Talon ground box, two-high walls on the exposed faces. The tower interior is not buildable, so the lock is built outside.

2,748 → ≈3,664 · 3 pallets · $10,970