Duo Overwatch Tower with Ladder Kill Box
A Recon Tower in the corner of a 13×13 ring, its ladder boxed with blocks and a door, wire on the blind faces. Two Support players, one with the Large hammer.
983 → ≈1,311 · 1 pallets · $10,420
Base · Squad · 3,897 supplies · Large hammer
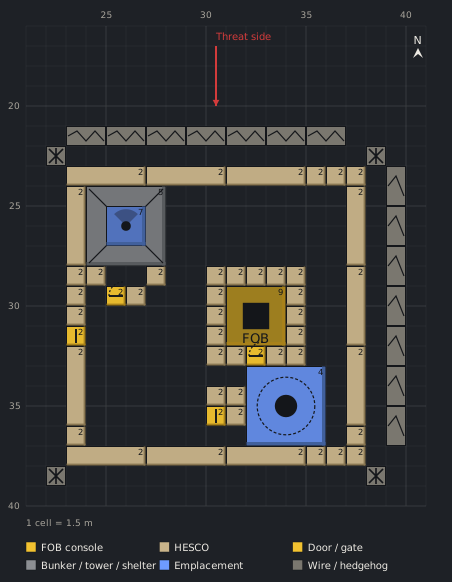
A Talon on a boxed Recon Tower and a Vanguard CIWS on a 4×4 platform with operator box, inside a 15×15 ring. Two Support 8 players, one Driver hauling Ammo.
| # | Structure | x,y | z | Phase |
|---|---|---|---|---|
| console | Forward Operating Base | 31,29 | 0 | 1 |
| cbox-n0-n1 | HESCO Block (Large) | 30,28 | 0 | 1 |
| cbox-n0-n2 | HESCO Block (Large) | 31,28 | 0 | 1 |
| cbox-n0-n3 | HESCO Block (Large) | 32,28 | 0 | 1 |
| cbox-n0-n4 | HESCO Block (Large) | 33,28 | 0 | 1 |
| cbox-n0-n5 | HESCO Block (Large) | 34,28 | 0 | 1 |
| cbox-e0-e1 | HESCO Block (Large) | 34,29 | 0 | 1 |
| cbox-e0-e2 | HESCO Block (Large) | 34,30 | 0 | 1 |
| cbox-e0-e3 | HESCO Block (Large) | 34,31 | 0 | 1 |
| cbox-s-door-s2 | Door | 32,32 | 0 | 1 |
| cbox-s0-s1 | HESCO Block (Large) | 30,32 | 0 | 1 |
| cbox-s0-s2 | HESCO Block (Large) | 31,32 | 0 | 1 |
| cbox-s1-s1 | HESCO Block (Large) | 33,32 | 0 | 1 |
| cbox-s1-s2 | HESCO Block (Large) | 34,32 | 0 | 1 |
| cbox-w0-w1 | HESCO Block (Large) | 30,29 | 0 | 1 |
| cbox-w0-w2 | HESCO Block (Large) | 30,30 | 0 | 1 |
| cbox-w0-w3 | HESCO Block (Large) | 30,31 | 0 | 1 |
| ring-n0-n1 | HESCO Wall | 23,23 | 0 | 2 |
| ring-n0-n2 | HESCO Wall | 27,23 | 0 | 2 |
| ring-n0-n3 | HESCO Wall | 31,23 | 0 | 2 |
| ring-n0-n4 | HESCO Block (Large) | 35,23 | 0 | 2 |
| ring-n0-n5 | HESCO Block (Large) | 36,23 | 0 | 2 |
| ring-n0-n6 | HESCO Block (Large) | 37,23 | 0 | 2 |
| ring-e0-e1 | HESCO Wall | 37,24 | 0 | 2 |
| ring-e0-e2 | HESCO Wall | 37,28 | 0 | 2 |
| ring-e0-e3 | HESCO Wall | 37,32 | 0 | 2 |
| ring-e0-e4 | HESCO Block (Large) | 37,36 | 0 | 2 |
| ring-s0-s1 | HESCO Wall | 23,37 | 0 | 2 |
| ring-s0-s2 | HESCO Wall | 27,37 | 0 | 2 |
| ring-s0-s3 | HESCO Wall | 31,37 | 0 | 2 |
| ring-s0-s4 | HESCO Block (Large) | 35,37 | 0 | 2 |
| ring-s0-s5 | HESCO Block (Large) | 36,37 | 0 | 2 |
| ring-s0-s6 | HESCO Block (Large) | 37,37 | 0 | 2 |
| ring-w-door-w8 | Door | 23,31 | 0 | 2 |
| ring-w0-w1 | HESCO Wall | 23,24 | 0 | 2 |
| ring-w0-w2 | HESCO Block (Large) | 23,28 | 0 | 2 |
| ring-w0-w3 | HESCO Block (Large) | 23,29 | 0 | 2 |
| ring-w0-w4 | HESCO Block (Large) | 23,30 | 0 | 2 |
| ring-w1-w1 | HESCO Wall | 23,32 | 0 | 2 |
| ring-w1-w2 | HESCO Block (Large) | 23,36 | 0 | 2 |
| tower | Recon Tower | 24,24 | 0 | 3 |
| tower-lb1 | HESCO Block (Large) | 24,28 | 0 | 4 |
| tower-lb2 | HESCO Block (Large) | 27,28 | 0 | 4 |
| tower-lb3 | HESCO Block (Large) | 26,29 | 0 | 4 |
| tower-ld1 | Door | 25,29 | 0 | 4 |
| talon-deck | Talon 9K-SAM | 25,25 | 5 | 5 |
| ciws-p00 | HESCO Block (Large) | 32,33 | 0 | 6 |
| ciws-p01 | HESCO Block (Large) | 32,34 | 0 | 6 |
| ciws-p02 | HESCO Block (Large) | 32,35 | 0 | 6 |
| ciws-p03 | HESCO Block (Large) | 32,36 | 0 | 6 |
| ciws-p10 | HESCO Block (Large) | 33,33 | 0 | 6 |
| ciws-p11 | HESCO Block (Large) | 33,34 | 0 | 6 |
| ciws-p12 | HESCO Block (Large) | 33,35 | 0 | 6 |
| ciws-p13 | HESCO Block (Large) | 33,36 | 0 | 6 |
| ciws-p20 | HESCO Block (Large) | 34,33 | 0 | 6 |
| ciws-p21 | HESCO Block (Large) | 34,34 | 0 | 6 |
| ciws-p22 | HESCO Block (Large) | 34,35 | 0 | 6 |
| ciws-p23 | HESCO Block (Large) | 34,36 | 0 | 6 |
| ciws-p30 | HESCO Block (Large) | 35,33 | 0 | 6 |
| ciws-p31 | HESCO Block (Large) | 35,34 | 0 | 6 |
| ciws-p32 | HESCO Block (Large) | 35,35 | 0 | 6 |
| ciws-p33 | HESCO Block (Large) | 35,36 | 0 | 6 |
| ciws | Vanguard CIWS | 32,33 | 2 | 7 |
| ciws-ob1 | HESCO Block (Large) | 31,34 | 0 | 7 |
| ciws-ob2 | HESCO Block (Large) | 31,35 | 0 | 7 |
| ciws-ob3 | HESCO Block (Large) | 30,34 | 0 | 7 |
| ciws-od | Door | 30,35 | 0 | 7 |
| hog-c1 | Hedgehog | 22,22 | 0 | 8 |
| hog-c2 | Hedgehog | 38,22 | 0 | 8 |
| hog-c3 | Hedgehog | 22,38 | 0 | 8 |
| hog-c4 | Hedgehog | 38,38 | 0 | 8 |
| wire-n1 | Barbed Wire | 23,21 | 0 | 8 |
| wire-n2 | Barbed Wire | 25,21 | 0 | 8 |
| wire-n3 | Barbed Wire | 27,21 | 0 | 8 |
| wire-n4 | Barbed Wire | 29,21 | 0 | 8 |
| wire-n5 | Barbed Wire | 31,21 | 0 | 8 |
| wire-n6 | Barbed Wire | 33,21 | 0 | 8 |
| wire-n7 | Barbed Wire | 35,21 | 0 | 8 |
| wire-e8 | Barbed Wire | 39,23 | 0 | 8 |
| wire-e9 | Barbed Wire | 39,25 | 0 | 8 |
| wire-e10 | Barbed Wire | 39,27 | 0 | 8 |
| wire-e11 | Barbed Wire | 39,29 | 0 | 8 |
| wire-e12 | Barbed Wire | 39,31 | 0 | 8 |
| wire-e13 | Barbed Wire | 39,33 | 0 | 8 |
| wire-e14 | Barbed Wire | 39,35 | 0 | 8 |
‡ contains disputed values
| Structure | Qty | Each | Menu | ≈ To finish | Hammer |
|---|---|---|---|---|---|
| Phase 01 · 224 → ≈299 | |||||
| HESCO Block (Large) | 15 | 14 (18) | 210 | ≈280 | Medium hammer |
| Door | 1 | 14 | 14 | ≈19 | Medium hammer |
| Forward Operating Base | 1 | 30 | 0 | ≈0 | Small hammer |
| Phase 02 · 674 → ≈899 | |||||
| HESCO Wall | 11 | 46 | 506 | ≈675 | Medium hammer |
| HESCO Block (Large) | 11 | 14 (18) | 154 | ≈205 | Medium hammer |
| Door | 1 | 14 | 14 | ≈19 | Medium hammer |
| Phase 03 · 61 → ≈81 | |||||
| Recon Tower | 1 | 61 (163) | 61 | ≈81 | Large hammer |
| Phase 04 · 56 → ≈75 | |||||
| HESCO Block (Large) | 3 | 14 (18) | 42 | ≈56 | Medium hammer |
| Door | 1 | 14 | 14 | ≈19 | Medium hammer |
| Phase 05 · 601 → ≈801 | |||||
| Talon 9K-SAM | 1 | 601 (60 / 80) | 601 | ≈801 | Large hammer |
| Phase 06 · 224 → ≈299 | |||||
| HESCO Block (Large) | 16 | 14 (18) | 224 | ≈299 | Medium hammer |
| Phase 07 · 957 → ≈1,276 | |||||
| Vanguard CIWS | 1 | 901 (90 / 1,201) | 901 | ≈1,201 | Large hammer |
| HESCO Block (Large) | 3 | 14 (18) | 42 | ≈56 | Medium hammer |
| Door | 1 | 14 | 14 | ≈19 | Medium hammer |
| Phase 08 · 126 → ≈168 | |||||
| Barbed Wire | 14 | 5 | 70 | ≈93 | Small hammer · $140 |
| Hedgehog | 4 | 14 | 56 | ≈75 | Small hammer |
| Total | 85 | 2,923 | ≈3,897 | Large hammer | |
The Talon goes up first: it is cheap to feed (50 Ammo per missile) and usually the first weapon a base needs. The CIWS follows once the platform is fully built, with two builders on the yellow X because the gun barely progresses on body hits. Both menu costs are disputed tenfold between sources; the cost card shows the range.
Deploy the FOB, take the Medium hammer from the console and box the console with large blocks before anything else. The 30-second console hack is the fastest way to lose the whole base.
The 15×15 ring with a door on the west face.
Recon Tower at the north-west corner, ladder facing south into the base, built to 100% before anything attaches.
Three blocks and a door around the ladder.
The Talon on the tower deck with nothing in front of it. One Ammo pallet feeds 36 missiles.
Sixteen large blocks as a 4×4 south of the console box, every one at 100%.
The gun on the platform, two builders on the X, then the operator box on its west side.
Hedgehogs on the corners and wire on the north and east faces.
No in-game proof yet. Built it? Send a screenshot.
Ridge · Hilltop · Anti-air · Defensive
A Recon Tower in the corner of a 13×13 ring, its ladder boxed with blocks and a door, wire on the blind faces. Two Support players, one with the Large hammer.
983 → ≈1,311 · 1 pallets · $10,420
Two players, one truck: a boxed console inside a 13×13 ring with a two-gate vehicle airlock, slalom and wire. The base every logistics run starts from.
1,086 → ≈1,448 · 1 pallets · $8,020
A 19×19 ring around a map tower: two-door vestibules on both ground entrances, corner bunkers, a Talon ground box, two-high walls on the exposed faces. The tower interior is not buildable, so the lock is built outside.
2,748 → ≈3,664 · 3 pallets · $10,970
The standard perimeter: seven walls, eleven large blocks and one door around an 11×11 footprint, 490 supplies on the menu.
490 → ≈653 · 1 pallets · $7,500