Skip to content
FOBplans

Module · Duo · 1,296 supplies · Medium hammer

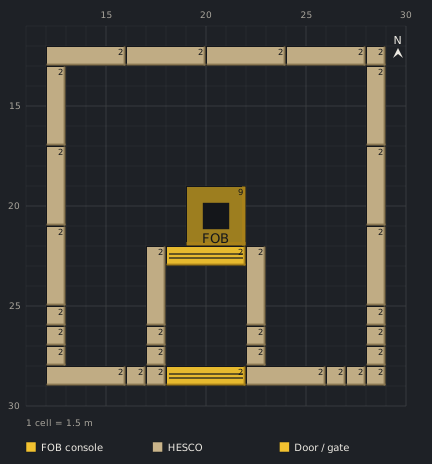
Vehicle airlock (two gates)

Outer gate, a six-cell corridor of walls and an inner gate that never points at the console: trucks get in, a breach does not. 200 supplies for the airlock itself.

Data only· Patch 0.11· Sep 18, 2026Updated Sep 18, 2026
  • 2–4 Players
  • Medium hammer · from kit
  • Support level 3
  • FOB required
  • 12 min
  • Support 3 · placer
Build modeDownload PNG
Generated preview1 cell = 1.5 m
Blueprint, top-down view33 pieces on a 19 × 19 cell grid (1 cell = 1.5 m).1520253015202530HESCO Wall (12,12)2HESCO Wall (16,12)2HESCO Wall (20,12)2HESCO Wall (24,12)2HESCO Block (Large) (28,12)2HESCO Wall (12,13)2HESCO Wall (28,13)2HESCO Wall (12,17)2HESCO Wall (28,17)2Forward Operating Base (19,19)FOB9HESCO Wall (12,21)2HESCO Wall (28,21)2HESCO Wall (17,22)2Gate (18,22)2HESCO Wall (22,22)2HESCO Block (Large) (12,25)2HESCO Block (Large) (28,25)2HESCO Block (Large) (12,26)2HESCO Block (Large) (17,26)2HESCO Block (Large) (22,26)2HESCO Block (Large) (28,26)2HESCO Block (Large) (12,27)2HESCO Block (Large) (17,27)2HESCO Block (Large) (22,27)2HESCO Block (Large) (28,27)2HESCO Wall (12,28)2HESCO Block (Large) (16,28)2HESCO Block (Large) (17,28)2Gate (18,28)2HESCO Wall (22,28)2HESCO Block (Large) (26,28)2HESCO Block (Large) (27,28)2HESCO Block (Large) (28,28)21 cell = 1.5 mFOB consoleHESCODoor / gate
972 menu · ≈1,296
Show as table
#Structurex,yzPhase
consoleForward Operating Base19,1901
ring-n0-n1HESCO Wall12,1202
ring-n0-n2HESCO Wall16,1202
ring-n0-n3HESCO Wall20,1202
ring-n0-n4HESCO Wall24,1202
ring-n0-n5HESCO Block (Large)28,1202
ring-e0-e1HESCO Wall28,1302
ring-e0-e2HESCO Wall28,1702
ring-e0-e3HESCO Wall28,2102
ring-e0-e4HESCO Block (Large)28,2502
ring-e0-e5HESCO Block (Large)28,2602
ring-e0-e6HESCO Block (Large)28,2702
ring-s-gate-s6Gate18,2802
ring-s0-s1HESCO Wall12,2802
ring-s0-s2HESCO Block (Large)16,2802
ring-s0-s3HESCO Block (Large)17,2802
ring-s1-s1HESCO Wall22,2802
ring-s1-s2HESCO Block (Large)26,2802
ring-s1-s3HESCO Block (Large)27,2802
ring-s1-s4HESCO Block (Large)28,2802
ring-w0-w1HESCO Wall12,1302
ring-w0-w2HESCO Wall12,1702
ring-w0-w3HESCO Wall12,2102
ring-w0-w4HESCO Block (Large)12,2502
ring-w0-w5HESCO Block (Large)12,2602
ring-w0-w6HESCO Block (Large)12,2702
va-a-w1HESCO Wall17,2203
va-a-w2HESCO Block (Large)17,2603
va-a-w3HESCO Block (Large)17,2703
va-b-e1HESCO Wall22,2203
va-b-e2HESCO Block (Large)22,2603
va-b-e3HESCO Block (Large)22,2703
va-inner-gateGate18,2203

Cost

Menu
972 supplies
≈ To finish
1,296–1,381 ‡
Starting stock
1,250
Pallets
1 (1 extra)
Ural trips
1
Cash per match
$7,900
One-time unlocks
$35,000
Builders
4

‡ contains disputed values

Modules used

Parts list

StructureQtyEachMenu≈ To finishHammer
Phase 01 · 0 → ≈0
Forward Operating Base1300≈0Small hammer
Phase 02 · 772 → ≈1,029
HESCO Wall1246552≈736Medium hammer
HESCO Block (Large)1214 (18)168≈224Medium hammer
Gate15252≈69Medium hammer
Phase 03 · 200 → ≈267
HESCO Wall24692≈123Medium hammer
HESCO Block (Large)414 (18)56≈75Medium hammer
Gate15252≈69Medium hammer
Total33972≈1,296Medium hammer

Build phases

Two gates need at least six cells between them so both can swing open. The corridor walls make the lane a kill zone for anything that rams the outer gate.

Phase 01

Console first

Deploy the FOB and take the Medium hammer from the console. Everything below is placed relative to the console at cell 20,20.

Phase 02

Ring with outer gate

A 17×17 ring with the outer gate on the road side. Gates are four cells wide; plan the ring so the gate sits on a wall segment, not a corner.

Phase 03

Corridor and inner gate

A wall and two blocks on each side of the lane, six cells deep, then the inner gate. A Ural needs the full four-cell width; check that nothing pokes into the lane.

Engine notes

  • DISPUTED_VALUE

In-game proof

No in-game proof yet. Built it? Send a screenshot.

Sources

  • steam-skivin
  • allthings-cluster
  • wardogs-zone-db
  • fobplans-research
  • Verified on Sep 18, 2026, Patch 0.11 · Methodology

Any · Flat · Logistics hub · Defensive

Related blueprints

Blueprint, top-down view26 pieces on a 14 × 18 cell grid (1 cell = 1.5 m).Barbed Wire (16,14)Barbed Wire (18,14)Barbed Wire (20,14)Barbed Wire (22,14)Hedgehog (15,15)Hedgehog (25,15)HESCO Wall (16,16)2HESCO Wall (20,16)2HESCO Block (Large) (24,16)2HESCO Wall (16,17)2HESCO Wall (24,17)2Barbed Wire (26,17)Forward Operating Base (19,19)FOB9Barbed Wire (26,19)HESCO Wall (16,21)2HESCO Block (Large) (22,21)2HESCO Block (Large) (23,21)2HESCO Block (Large) (24,21)2Door (22,22)2Door (24,22)2HESCO Block (Large) (23,23)2HESCO Block (Large) (24,23)2HESCO Wall (17,24)2HESCO Wall (21,24)2Hedgehog (15,25)Hedgehog (25,25)1 cell = 1.5 m
Solo · 1–2 Players · Medium hammer

Solo Pocket FOB

A one-player FOB built entirely from the kit's 1,250 starting stock: 9×9 HESCO ring, corner door, infantry airlock, hedgehogs and wire.

520 → ≈693 · 1 pallets · $7,560

Blueprint, top-down view85 pieces on a 20 × 24 cell grid (1 cell = 1.5 m).Barbed Wire (23,21)Barbed Wire (25,21)Barbed Wire (27,21)Barbed Wire (29,21)Barbed Wire (31,21)Barbed Wire (33,21)Barbed Wire (35,21)Hedgehog (22,22)Hedgehog (38,22)HESCO Wall (23,23)2HESCO Wall (27,23)2HESCO Wall (31,23)2HESCO Block (Large) (35,23)2HESCO Block (Large) (36,23)2HESCO Block (Large) (37,23)2Barbed Wire (39,23)HESCO Wall (23,24)2Recon Tower (24,24)5HESCO Wall (37,24)2Barbed Wire (39,25)Barbed Wire (39,27)HESCO Block (Large) (23,28)2HESCO Block (Large) (24,28)2HESCO Block (Large) (27,28)2HESCO Block (Large) (30,28)2HESCO Block (Large) (31,28)2HESCO Block (Large) (32,28)2HESCO Block (Large) (33,28)2HESCO Block (Large) (34,28)2HESCO Wall (37,28)2HESCO Block (Large) (23,29)2Door (25,29)2HESCO Block (Large) (26,29)2HESCO Block (Large) (30,29)2Forward Operating Base (31,29)FOB9HESCO Block (Large) (34,29)2Barbed Wire (39,29)HESCO Block (Large) (23,30)2HESCO Block (Large) (30,30)2HESCO Block (Large) (34,30)2Door (23,31)2HESCO Block (Large) (30,31)2HESCO Block (Large) (34,31)2Barbed Wire (39,31)HESCO Wall (23,32)2HESCO Block (Large) (30,32)2HESCO Block (Large) (31,32)2Door (32,32)2HESCO Block (Large) (33,32)2HESCO Block (Large) (34,32)2HESCO Wall (37,32)2HESCO Block (Large) (32,33)2HESCO Block (Large) (33,33)2HESCO Block (Large) (34,33)2HESCO Block (Large) (35,33)2Barbed Wire (39,33)HESCO Block (Large) (30,34)2HESCO Block (Large) (31,34)2HESCO Block (Large) (32,34)2HESCO Block (Large) (33,34)2HESCO Block (Large) (34,34)2HESCO Block (Large) (35,34)2Door (30,35)2HESCO Block (Large) (31,35)2HESCO Block (Large) (32,35)2HESCO Block (Large) (33,35)2HESCO Block (Large) (34,35)2HESCO Block (Large) (35,35)2Barbed Wire (39,35)HESCO Block (Large) (23,36)2HESCO Block (Large) (32,36)2HESCO Block (Large) (33,36)2HESCO Block (Large) (34,36)2HESCO Block (Large) (35,36)2HESCO Block (Large) (37,36)2HESCO Wall (23,37)2HESCO Wall (27,37)2HESCO Wall (31,37)2HESCO Block (Large) (35,37)2HESCO Block (Large) (36,37)2HESCO Block (Large) (37,37)2Hedgehog (22,38)Hedgehog (38,38)Vanguard CIWS (32,33) z24Talon 9K-SAM (25,25) z571 cell = 1.5 m
Squad · 4–6 Players · Large hammer

Squad AA Nest: Talon on Tower Deck + CIWS Platform

A Talon on a boxed Recon Tower and a Vanguard CIWS on a 4×4 platform with operator box, inside a 15×15 ring. Two Support 8 players, one Driver hauling Ammo.

2,923 → ≈3,897 · 3 pallets · $10,840

Blueprint, top-down view86 pieces on a 21 × 28 cell grid (1 cell = 1.5 m).Barbed Wire (23,21)Barbed Wire (25,21)Barbed Wire (27,21)Barbed Wire (29,21)Barbed Wire (31,21)Barbed Wire (33,21)Barbed Wire (35,21)Hedgehog (22,22)Hedgehog (38,22)Barbed Wire (21,23)HESCO Wall (23,23)2HESCO Wall (27,23)2HESCO Wall (31,23)2HESCO Block (Large) (35,23)2HESCO Block (Large) (36,23)2HESCO Block (Large) (37,23)2Barbed Wire (39,23)HESCO Wall (23,24)2Bunker (24,24)2Bunker (33,24)2HESCO Wall (37,24)2Barbed Wire (21,25)Barbed Wire (39,25)Barbed Wire (21,27)Barbed Wire (39,27)HESCO Wall (23,28)2HESCO Block (Large) (30,28)2HESCO Block (Large) (31,28)2HESCO Block (Large) (32,28)2HESCO Block (Large) (33,28)2HESCO Block (Large) (34,28)2HESCO Wall (37,28)2Barbed Wire (21,29)HESCO Block (Large) (28,29)2HESCO Block (Large) (29,29)2HESCO Block (Large) (30,29)2Forward Operating Base (31,29)FOB9HESCO Block (Large) (34,29)2Barbed Wire (39,29)Door (28,30)2Door (30,30)2HESCO Block (Large) (34,30)2Barbed Wire (21,31)HESCO Block (Large) (28,31)2HESCO Block (Large) (29,31)2HESCO Block (Large) (30,31)2HESCO Block (Large) (34,31)2Barbed Wire (39,31)HESCO Wall (23,32)2HESCO Block (Large) (30,32)2HESCO Block (Large) (31,32)2HESCO Block (Large) (32,32)2HESCO Block (Large) (33,32)2HESCO Block (Large) (34,32)2HESCO Wall (37,32)2Barbed Wire (21,33)HESCO Wall (24,33)2Gate (25,33)2HESCO Wall (29,33)2HESCO Block (Large) (31,33)2Recon Tower (32,33)5Barbed Wire (39,33)Door (30,34)2Barbed Wire (21,35)HESCO Block (Large) (30,35)2Barbed Wire (39,35)HESCO Block (Large) (23,36)2HESCO Block (Large) (31,36)2HESCO Block (Large) (37,36)2HESCO Block (Large) (23,37)2HESCO Block (Large) (24,37)2Gate (25,37)2HESCO Wall (29,37)2HESCO Wall (33,37)2HESCO Block (Large) (37,37)2Hedgehog (22,38)Hedgehog (38,38)Hedgehog (24,40)Hedgehog (30,40)Hedgehog (27,42)HESCO Wall (23,23) z24HESCO Wall (27,23) z24HESCO Wall (31,23) z24HESCO Block (Large) (35,23) z24HESCO Block (Large) (36,23) z24HESCO Block (Large) (37,23) z241 cell = 1.5 m
Squad · 4–6 Players · Large hammer

Squad Hot Zone Bastion (4–6 Players, Two-High Walls)

A 15×15 ring with vehicle airlock, two bunkers covering the far wall, a tower with kill box, a second wall layer on the threat face, hedgehogs and wire. Built to sit in the Hot Zone and stay there.

1,730 → ≈2,307 · 2 pallets · $10,510

Blueprint, top-down view59 pieces on a 24 × 23 cell grid (1 cell = 1.5 m).Barbed Wire (23,21)Barbed Wire (25,21)Barbed Wire (27,21)Barbed Wire (29,21)Barbed Wire (31,21)Barbed Wire (33,21)Barbed Wire (35,21)Barbed Wire (21,23)HESCO Wall (23,23)2HESCO Wall (27,23)2HESCO Wall (31,23)2HESCO Block (Large) (35,23)2HESCO Block (Large) (36,23)2HESCO Block (Large) (37,23)2HESCO Wall (23,24)2HESCO Block (Large) (24,24)2HESCO Block (Large) (25,24)2HESCO Block (Large) (26,24)2HESCO Block (Large) (27,24)2HESCO Block (Large) (28,24)2HESCO Wall (37,24)2Barbed Wire (21,25)HESCO Block (Large) (24,25)2Forward Operating Base (25,25)FOB9HESCO Block (Large) (28,25)2HESCO Block (Large) (24,26)2Door (28,26)2Barbed Wire (21,27)HESCO Block (Large) (24,27)2HESCO Block (Large) (28,27)2HESCO Wall (23,28)2HESCO Block (Large) (24,28)2HESCO Block (Large) (25,28)2HESCO Block (Large) (26,28)2HESCO Block (Large) (27,28)2HESCO Block (Large) (28,28)2HESCO Block (Large) (37,28)2Barbed Wire (21,29)Gate (37,29)2Hedgehog (40,29)Barbed Wire (21,31)HESCO Wall (23,32)2Hedgehog (42,32)Barbed Wire (21,33)HESCO Wall (24,33)2Gate (25,33)2HESCO Wall (29,33)2HESCO Wall (37,33)2Refuel Station (31,34)F2Repair Station (34,34)RBarbed Wire (21,35)Hedgehog (40,35)HESCO Block (Large) (23,36)2HESCO Block (Large) (23,37)2HESCO Block (Large) (24,37)2Gate (25,37)2HESCO Wall (29,37)2HESCO Wall (33,37)2HESCO Block (Large) (37,37)21 cell = 1.5 m
Squad · 3–5 Players · Large hammer

Squad Logistics Hub: Refuel, Repair and Vehicle Airlock

Entry gate with airlock on the south face, exit gate on the east face, refuel and repair stations beside the lane between them: trucks drive in, service and drive out without turning.

1,398 → ≈1,864 · 2 pallets · $10,440